- AI Receptionists Usage and Advantages
- Pricing
- Creating New Phone Lines for AI Receptionists
- Access and Existing AI Receptionists
- Adding an AI Receptionist
- Knowledge Base Files
- AI Receptionists Agent Settings
- Call Transfers
- Department Emails
- SMS Messages
- AI Receptionists Integrations
 AI agents can be unpredictable and can make mistakes. Telebroad will not be responsible in any way for the behaviour of AI agents or related consequences.
AI Receptionists Usage and Advantages
AI Receptionists are virtual agents (often referred to as such) that can automatically answer and handle multiple incoming phone calls. They offer round-the-clock service 365 days a year on nights, weekends, and holidays.
AI Receptionists can almost eliminate missed calls by drastically improving call responsiveness with consistent high-quality assistance, and also reducing the frustration of busy signals or long waits.
They can support large companies that need to address high call volume overflow, or smaller businesses that just can't always answer the phone or want better after-hours call handling.
Human-Like Conversation, Performing Actions, and Escalation Options
AI Receptionists can understand speech and respond in a human-like voice, conversing with callers in a natural professional manner. They can answer common questions about your business and , with the integration feature, can even access external software and servers to fetch data and perform parallel actions during a live call.
When they cannot provide certain details, they can offer to transfer calls to a human user, a relevant department, or a fallback extension. They can also offer a follow-up response by sending email or SMS notifications to staff.
Beta Phase Note
The AI Receptionists feature is currently in early beta phase as Telebroad continues to improve and refine it. While it is fully functional, you should thoroughly test AI agents before deploying them to live customers and continue to monitor calls handled by AI agents initially.
Pricing
The AI Receptionist feature is not included in your standard plan. Pricing is usage-based at 20 cents per minute. You only pay for the minutes your AI receptionist is actively on calls. You can set a maximum call duration limit to control costs.
There are no additional setup fees to configure a basic AI receptionist.
You can contact Telebroad sales for volume pricing or bundle plan options.
Creating New Phone Lines for AI Receptionists
AI Receptionists can be considered autonomous agents in the sense that they require their own phone lines to operate.
Technically, you can assign them to any existing user's line, but that will prevent the user from receiving calls, even if the AI agent is disabled, as calls will be routed to the fallback destination.
Therefore, you should create a new phone line for each new AI receptionist and route calls to this new line.
Since phone lines are attached to users, to keep things separate, you can optionally even go a step further and create a new user for the AI receptionist.
Adding new lines is explained here. Adding new users is explained here.
Access and Existing AI Receptionists
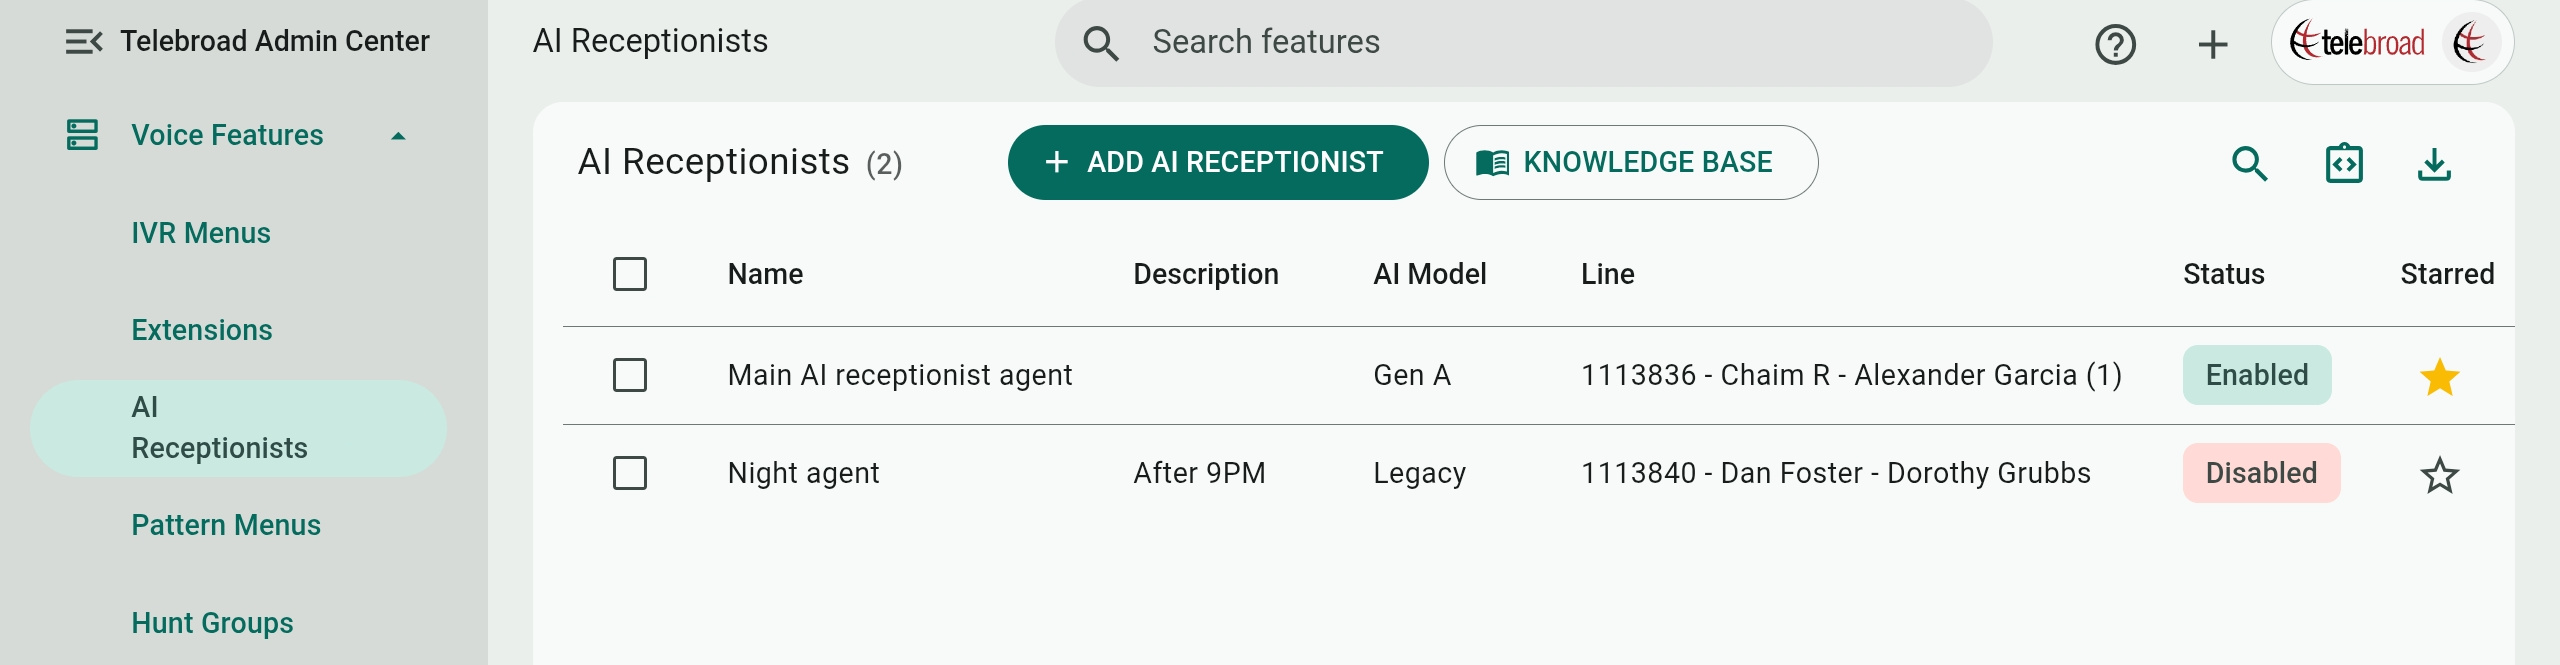
The AI Receptionists feature is accessed from the side navigation menu under Voice Features>AI Receptionists.
The page lists existing AI receptionists by Name, Description, the AI Model the agent is using, Line (a dedicated phone line for the AI receptionist as explained above), and Status (Enabled or Disabled) columns. Clicking  on the Starred column will add an AI receptionist to the home page Starred Features panel for fast access.
Use the  button to open a page with a list of AI Receptionists integrations.
Delete existing AI receptionists by checking them and selecting  , but be aware that this cannot be undone!
Adding an AI Receptionist
To create a new agent, click the ADD AI Receptionists button and continue to define the settings and prompts discussed in the following sections. You can also add a new agent from the Voice Features Quick menu.
Clicking Next or Previous will move you between the three settings tabs. Click Create to finish configuring the agent. You will see a pricing and disclaimer screen. Click Confirm and Enable to activate the agent.
Knowledge Base Files
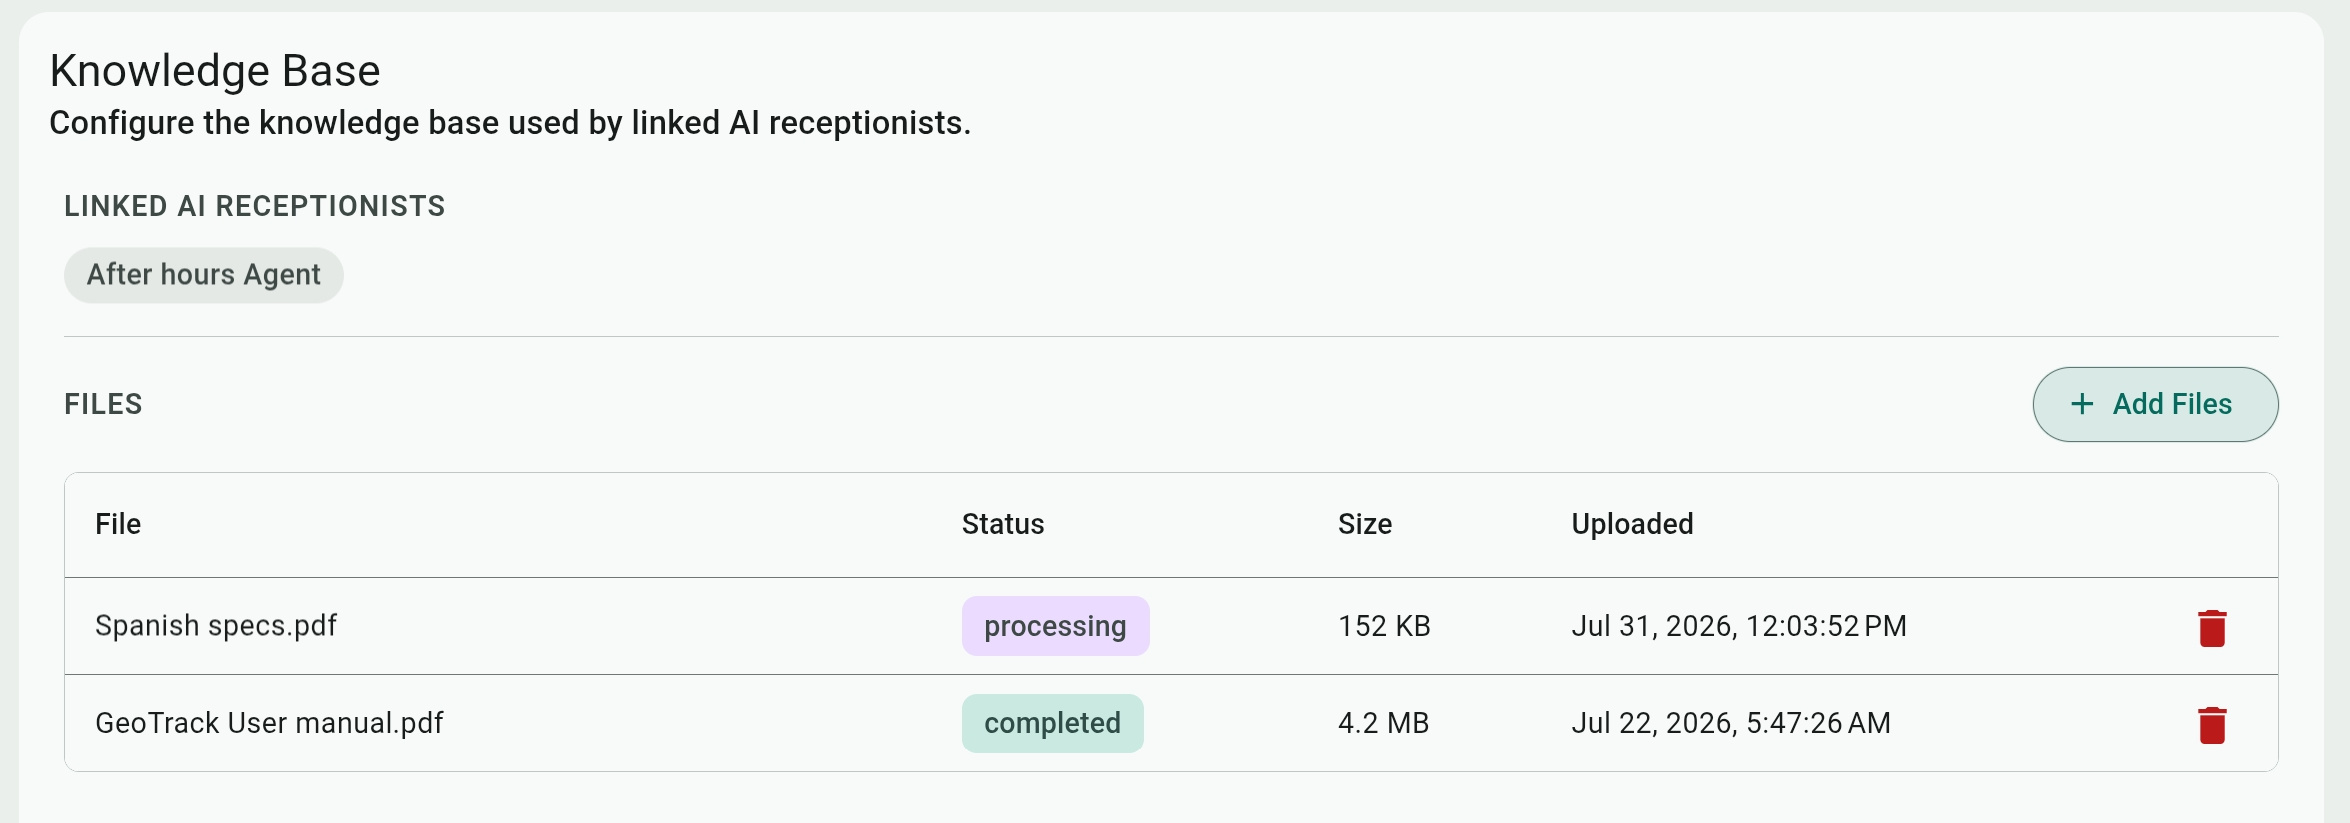
Click the Knowledge Base button on the main page to open a page where you can Add Files containing any text for the AI to study and use for guidance, details, and providing additional information when conversing with callers.
Depending on their size, uploaded files show a processing status and can take anywhere between a few seconds and a few minutes to get analyzed by the AI.
To use the Knowledge Base, you need to link AI Receptionists to it individually from their Agent Settings.
AI Receptionists Agent Settings
Select or create an AI agent to show its settings and tabs – Agent Settings, Call Transfers, Department Emails, SMS Messages, and Integrations.
Only the Agent Settings are mandatory. The agent can be activated without the other three tabs; however, they are important to allow the AI agent to deal with situations outside its scope of knowledge or simply to transfer calls to a human when the caller requests it.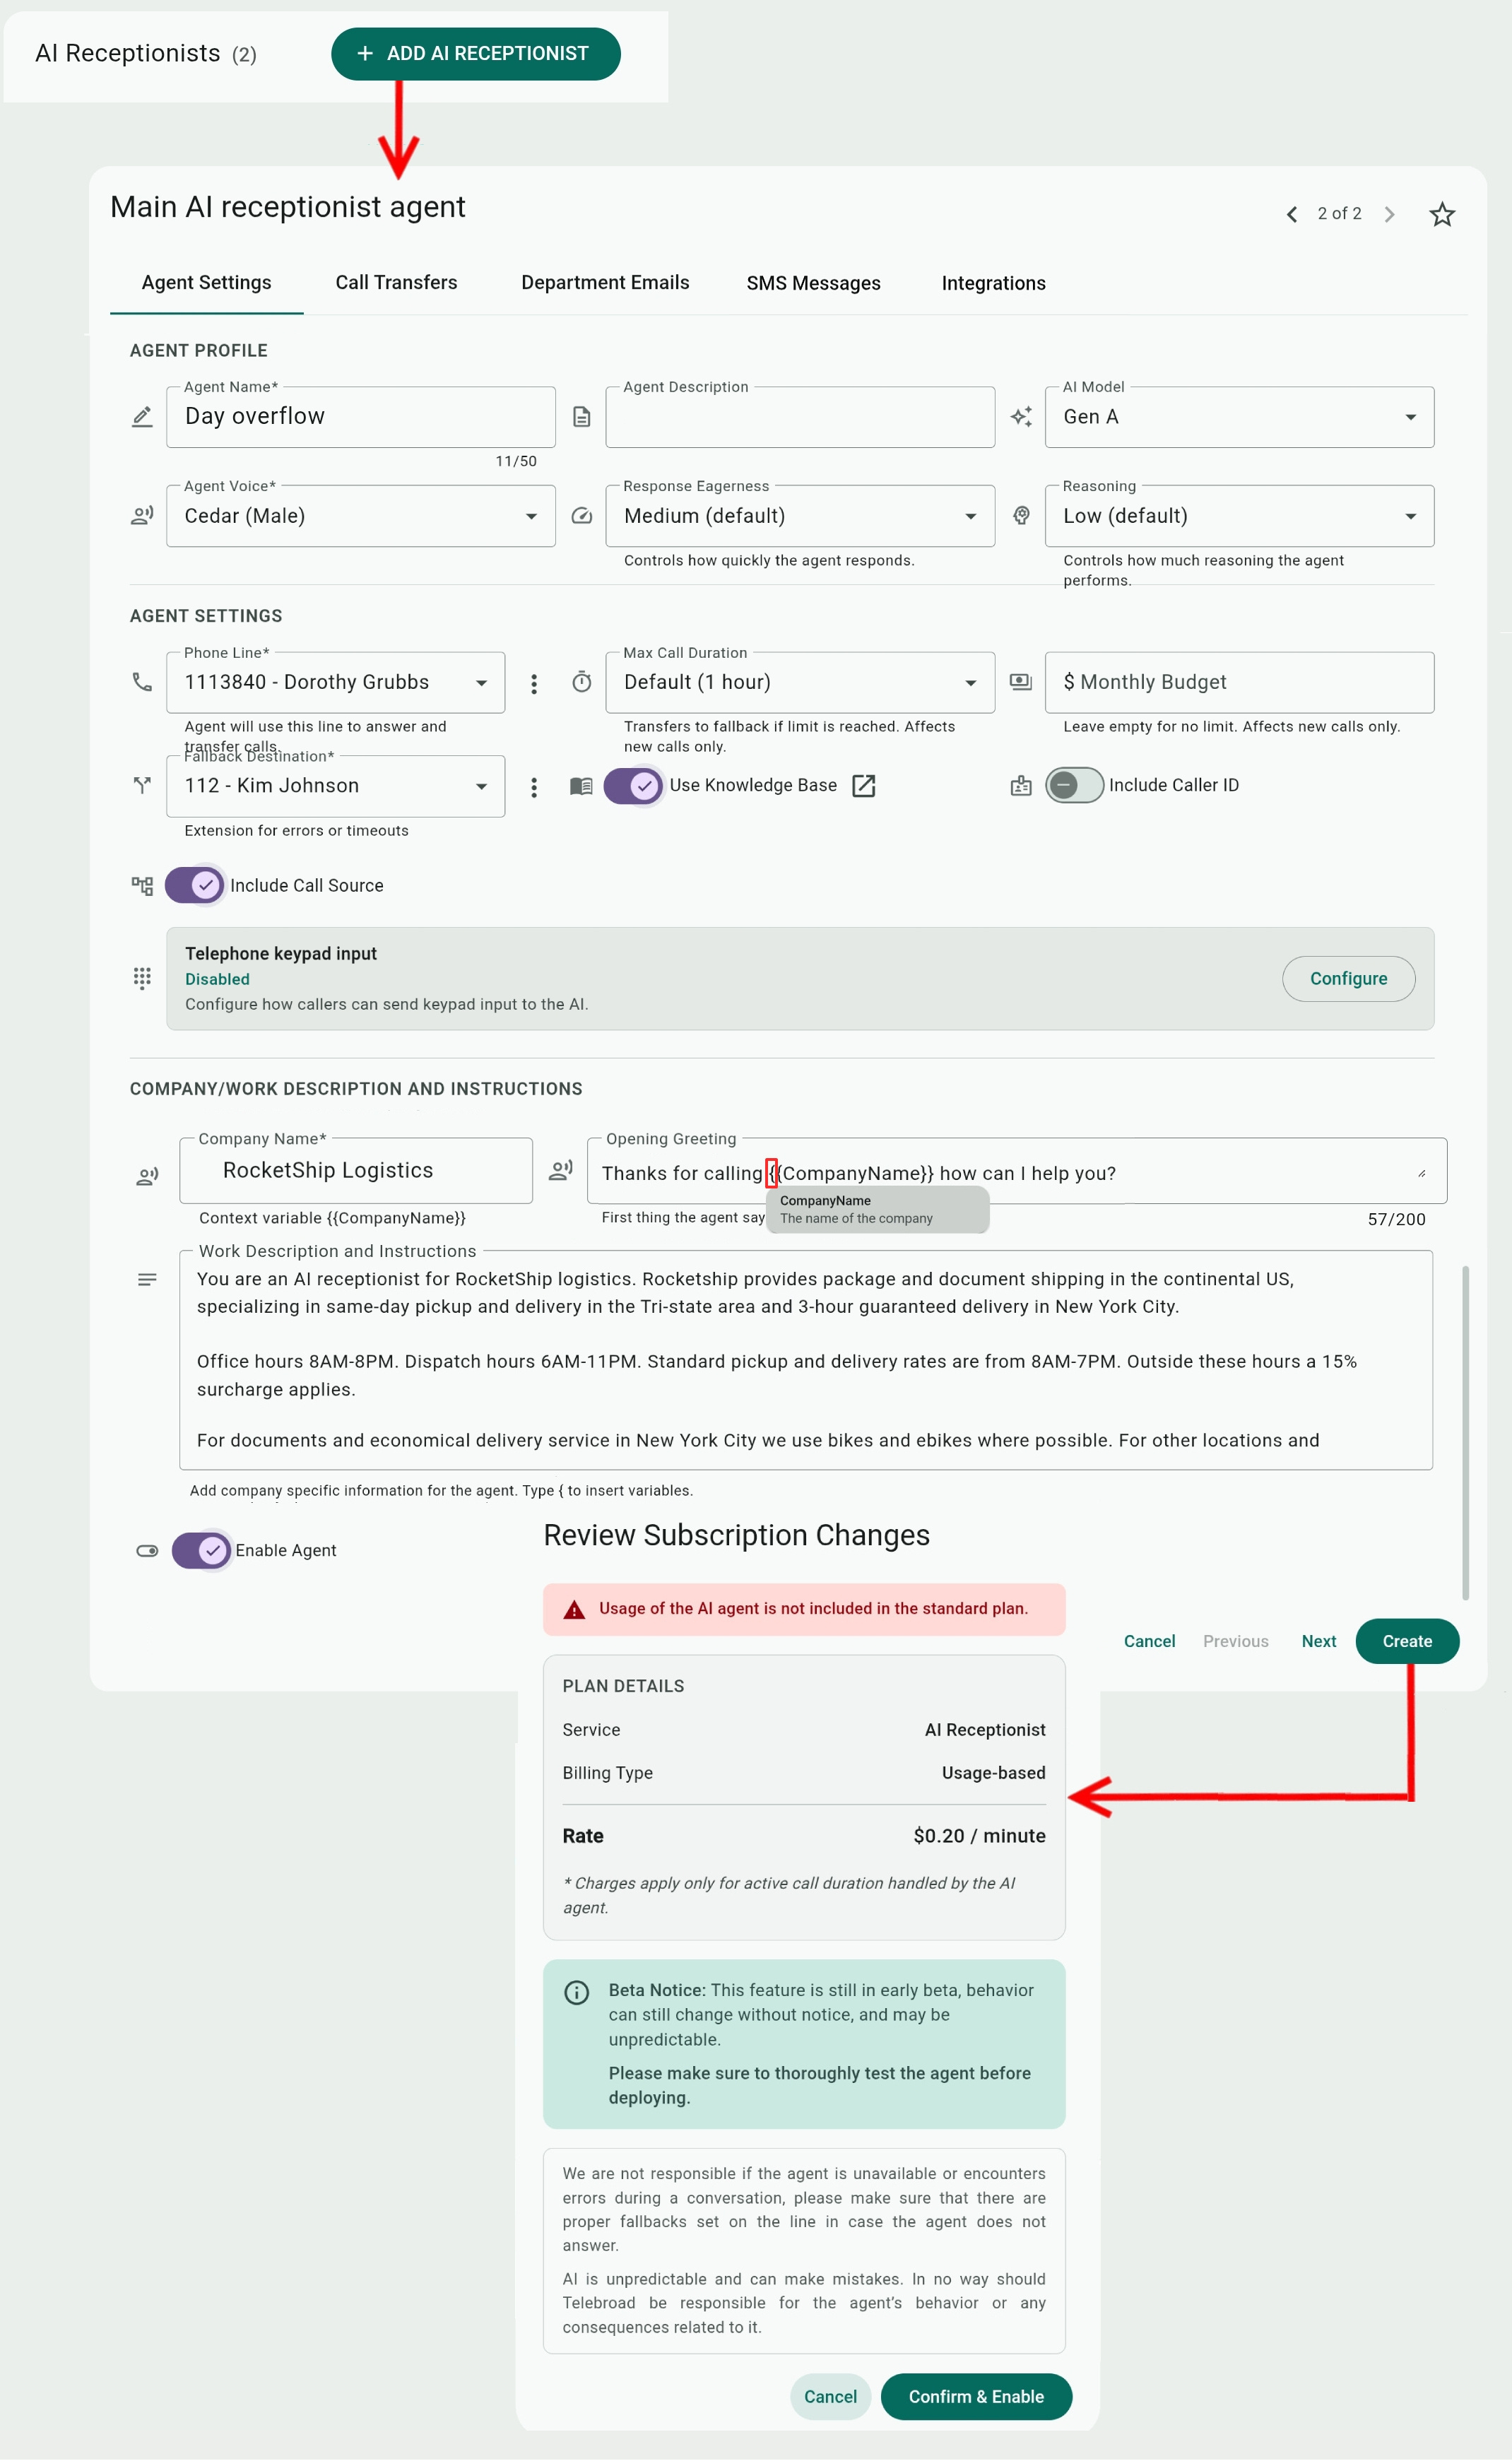
Agent Profile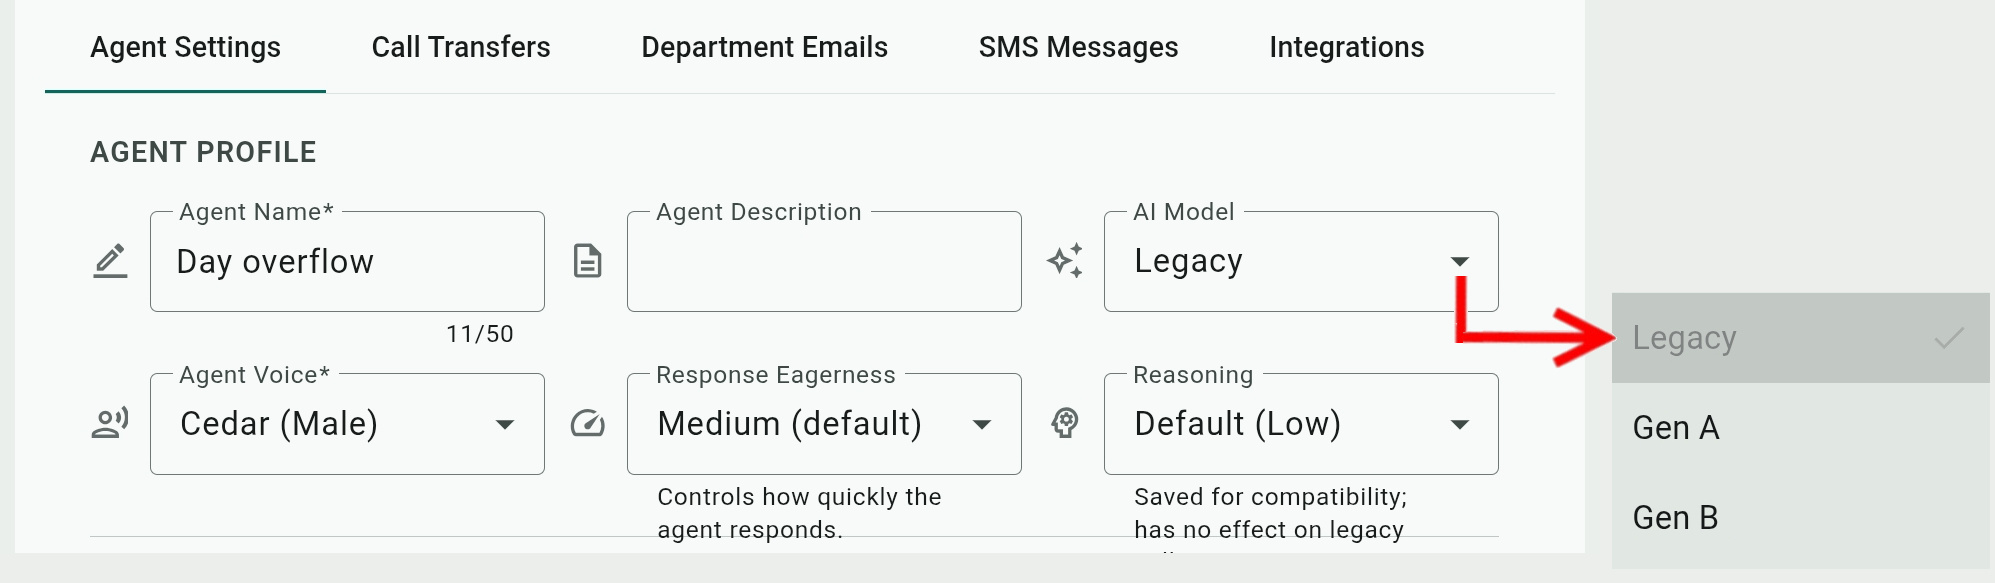
- Agent Name / Agent Description: Self-explanatory. The description is optional.
- AI Model: The Legacy AI model is deprecated and will be discontinued in the future. It cannot use the Knowledge Base, Caller ID, Call Source, or Telephone Keypad Input options.
Since every model behaves differently, there is some risk of breaking existing implementations when switching models, the Legacy model will still be the default choice for AI agents created before the addition of the newer models.
Once you upgrade, it is not possible to go back to the Legacy model, but you can switch between Gen A and Gen B models.
When you do switch to the newer models, please carefully test and monitor the receptionist to ensure it behaves as expected.
The newer models allow the AI receptionist to have stronger instruction-following reasoning, handle more complex requests and tools, improved letter and number recognition, and have better capacity to retain context during longer calls. - Agent Voice: Each model has a different set of available AI voices. You can click
 to preview how the agent sounds before selecting it.
 - Response Eagerness (available for Gen A model only): This determines the AI's ability and speed to proactively process and respond to the caller.
The High option will allow the AI to answer faster, but at the same time may cause it to interrupt the caller or second guess them. The default Medium option provides a balance between speed and accuracy. The Low option will ensure the AI delivers the most accurate and relevant details, but with a somewhat slower response speed.
You can further fine-tune this in the Work Description and Instructions field with prompts like "Wait for the caller to completely finish their thoughts before answering.", "Do not assume details and request additional information from the caller if necessary.", or "Identify natural short pauses in the caller's speech and do not interrupt them while they are still in the middle of a sentence or still forming an idea." - Reasoning (available for Gen A model only): Reasoning allows the AI to apply more advanced analysis to the delivery of desired answers, and is one of the key features of the new Gen A model. Instead of just statistically predicting the next word, as in common LLMs, it breaks its response process into a sequence of steps that mimic thinking and allow it to self evaluate its answers.
Reasoning does require more computing time. You can select Minimal if you find the Default (Low) reasoning to be too slow in its response time. - Speech detection sensitivity (available for Gen B model only): Determines how the AI decides when a user is speaking and how it handles ambient noise or silence.
The Low (default) option ignores minor background noise, breathing, and nearby conversations, and it ensures the AI agent mostly reacts to the caller's speech. The tradeoff is that it is less perceptive to callers with quieter voices.
The High option makes the AI agent react to quieter and softer speech, but this also introduces a potential to process irrelevant background noise and thus interrupt the caller.
Agent Settings
- Phone Line: Select a phone line for the AI agent. As explained above, you should create a new phone line for the AI agent.
- Max Call Duration: Since AI Receptionist calls are billed per minute, you can limit the duration of calls to avoid runaway calls. When the limit is reached (timed out), the call is routed to the fallback destination extension.
- Monthly budget: This lets you control your expenses. Calls will be routed to the fallback destination when the monthly budget limit is reached. Leave the field empty for no limit.
- Fallback Destination: This is an important option for ensuring callers are not stranded. It will route calls to the extension selected here if the AI agent is disabled, the AI system is temporarily unavailable, the monthly budget is exceeded, or for any other technical reason. It will also route the call if it has reached the maximum call duration and timed out.
You can assign the fallback extension to any Admin Center destination or feature. Extensions are covered in this article. - Use Knowledge Base: Toggle this on to provide the agent with access to the Knowledge Base so it can use its files for guidance, details, and providing additional information when conversing with callers.
- Include Caller ID: Toggle this on to share the caller name and number with the AI.
If it is toggled off, you can instruct the AI to request these from the caller if needed. But even when toggled on, it is a good practice to instruct the AI to verify the correctness of the name and number with the caller. - Include Call Source: Toggle this on to share the originating queue, IVR, hunt group, etc. with the AI.
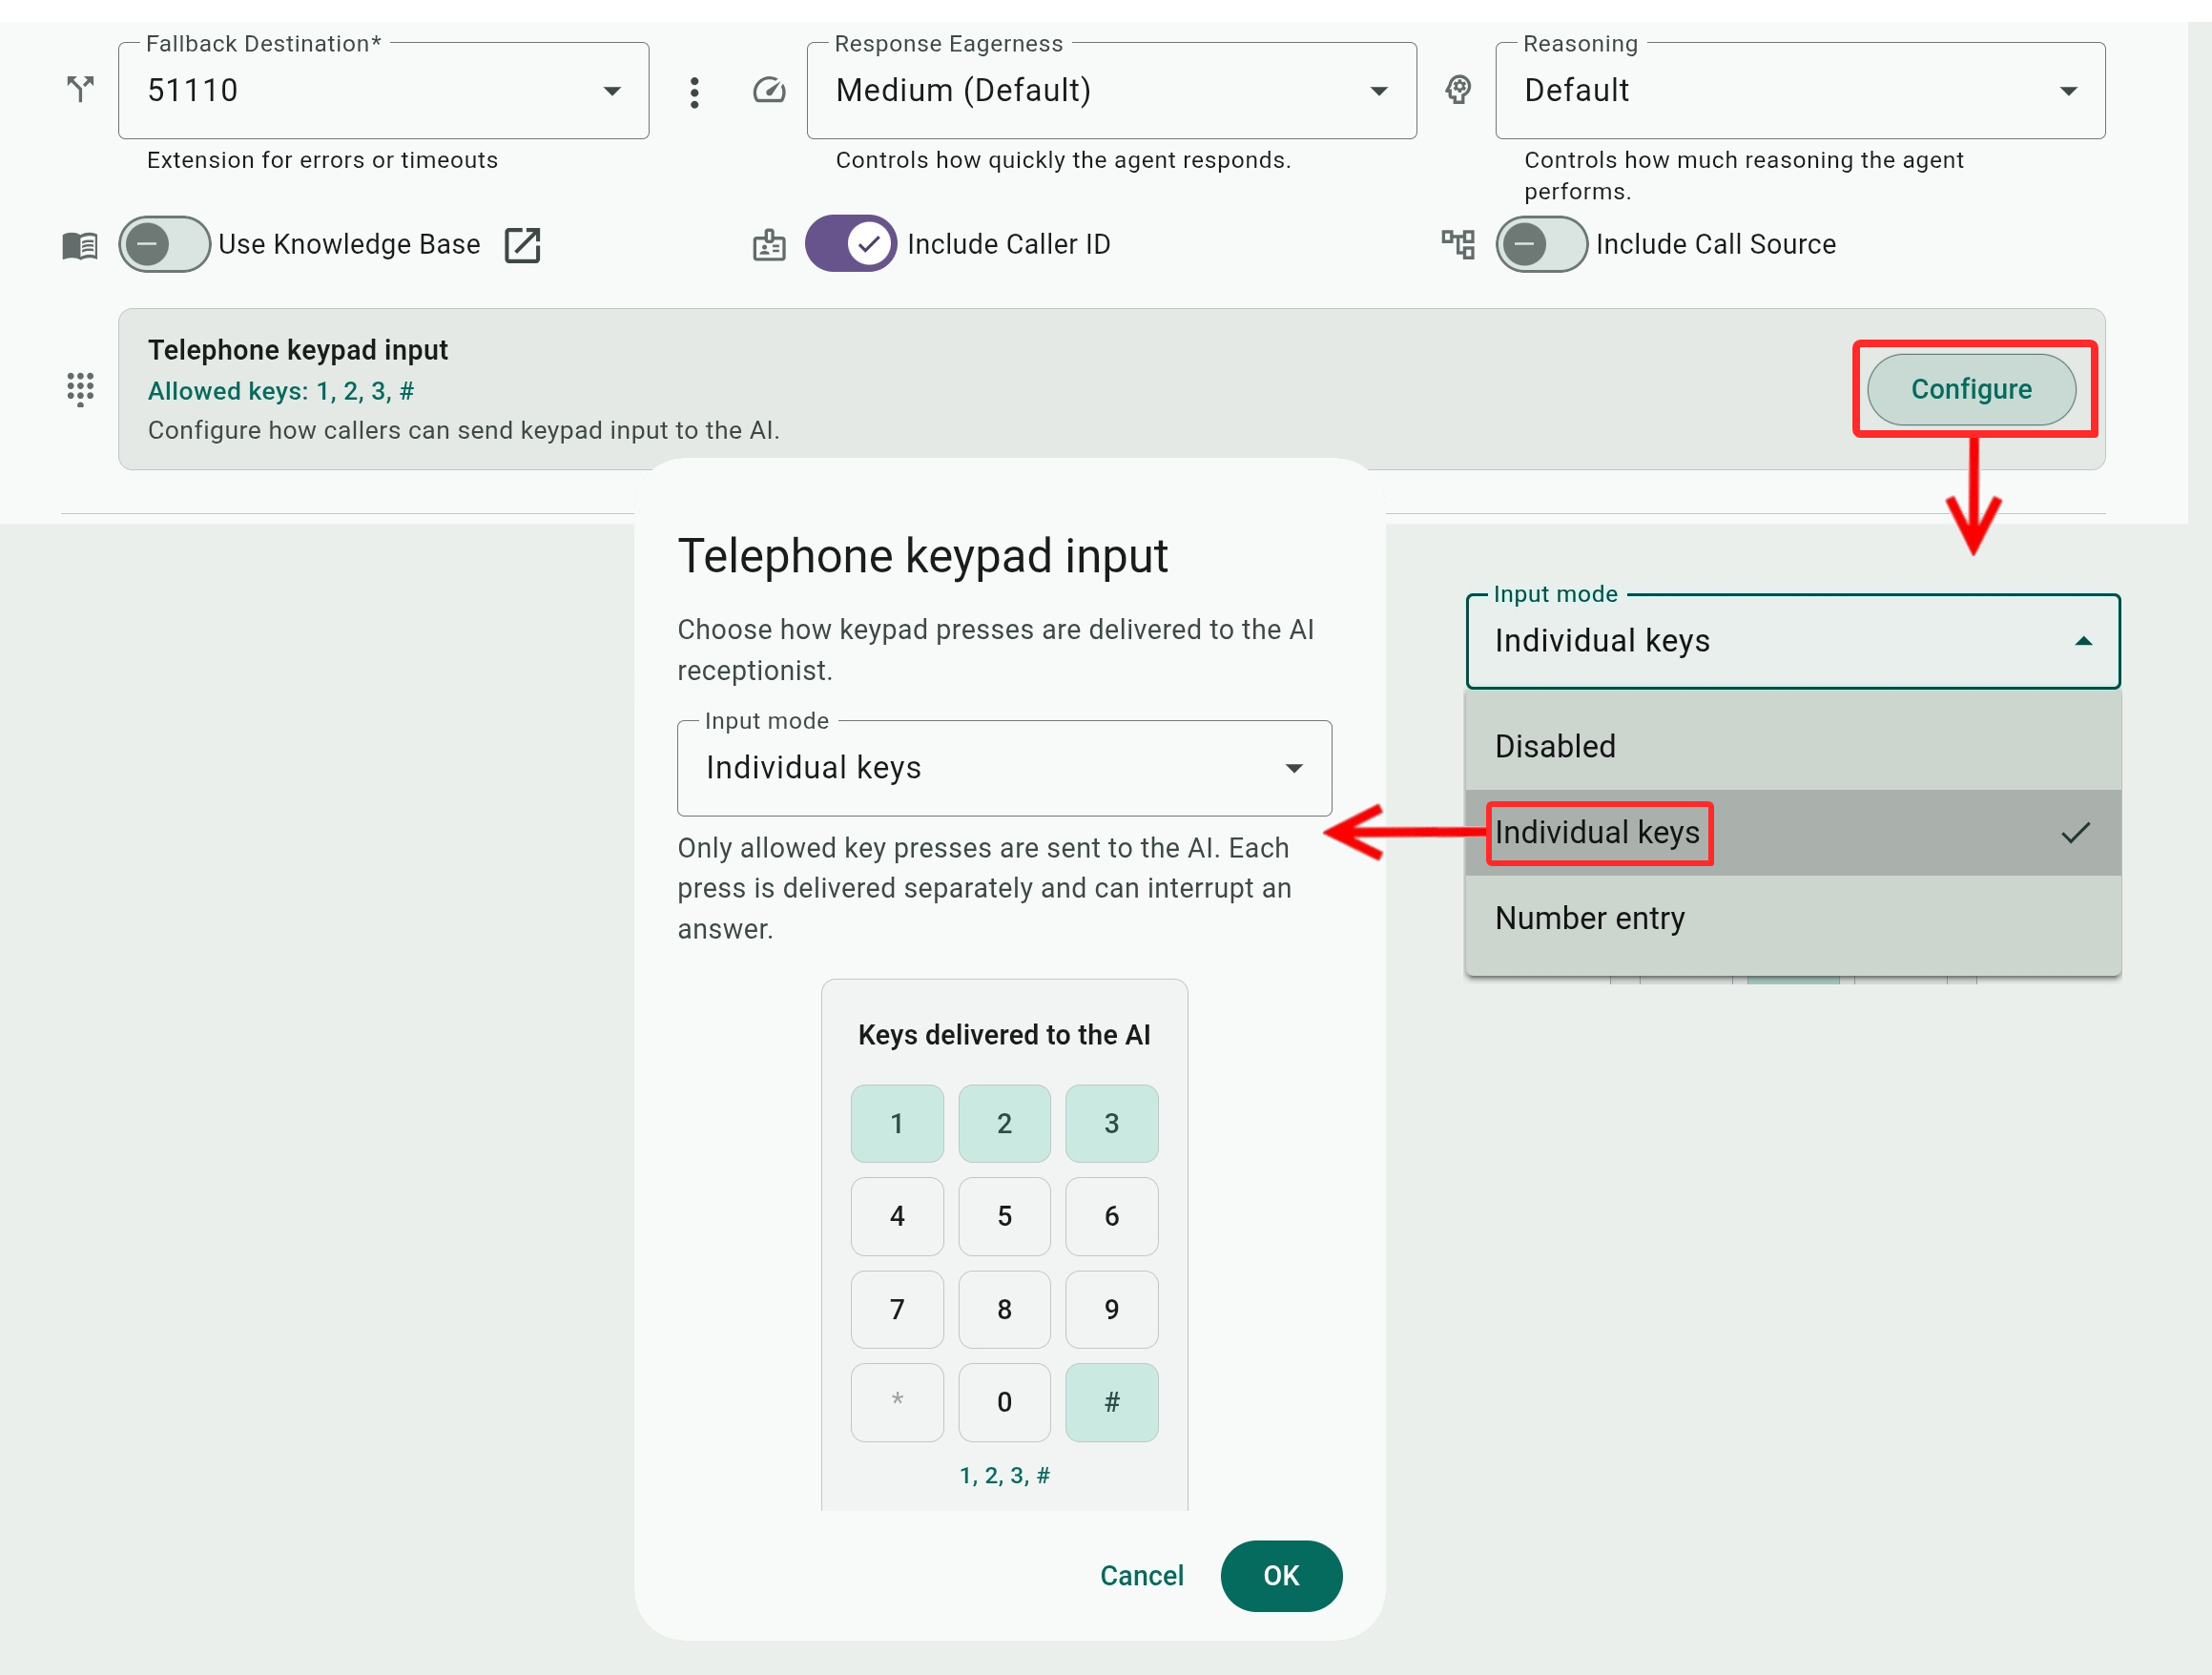
- Telephone Keypad Input: Allows the AI to collect keypad input from callers as answers to the AI request for information. Click Configure and switch the setting from Disabled to:
- Individual keys: The AI collects only single key-press digit input. Use the keypad to select all the keys the AI may accept from the caller.
- Number entry: The AI collects up to 20 digits as one input value, preserving leading zeros.
In the Inactivity timeout field, tell the AI how many seconds to wait before considering the caller is done entering the complete value, or enter 0 to have the AI prompt the caller to press # when finishing entering the complete value.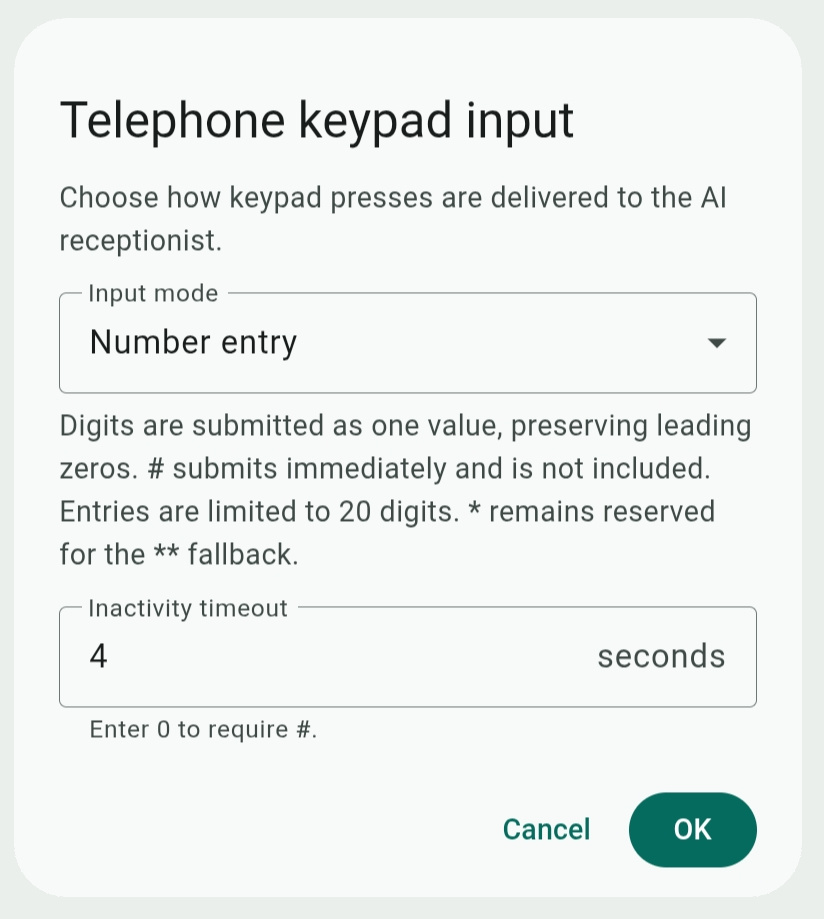
- Individual keys: The AI collects only single key-press digit input. Use the keypad to select all the keys the AI may accept from the caller.
Company/Work Description and Instructions
- Company Name (mandatory): You can reference the company name in other prompts and instructions (specifically, in the opening greeting) using double curly brackets – {{CompanyName}}.
Opening Greeting: This is how the agent introduces itself and greets the caller at the beginning of their conversation.
Leave it empty to use the default greeting.
You can reference the {{CompanyName}} variable by typing { and selecting it.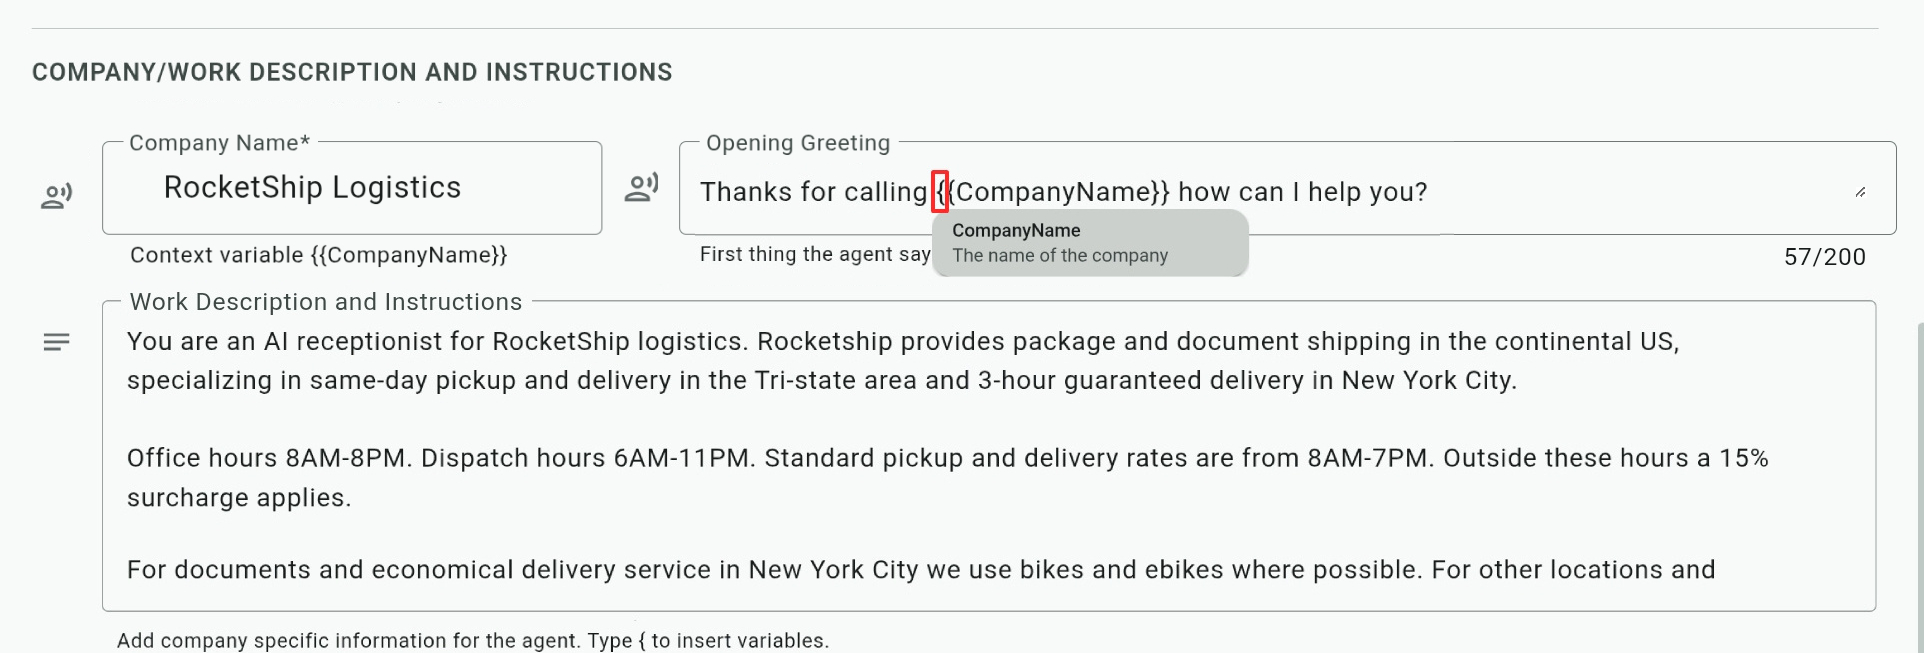
- Work Description and Instructions: Here you can inform the agent about the company and any specific details that it can use for conversing with callers.
You can also include important rules and behavior restrictions for the agent, including how it should handle call transfers, SMS messages, or email requests.
You may also add {{variables}} enclosed in double curly brackets to be used elsewhere in this field or in other prompts and instructions. For example, using a prompt of "When processing a new order, ask the caller for a {{shipping_date}}. If the {{shipping_date}} falls on the weekend, inform the caller about weekend rates and request their approval for billed charge."
Call Transfers
Describe and set up extensions for the AI agent to transfer calls when a caller requests human assistance or when there is a call situation the AI cannot or shouldn't handle.
Extensions can be assigned to a user's line or to any Admin Center destination or feature (a queue, hunt group, department IVR, etc.). Extensions are covered in this article.
You can also set up parameters for when the AI should abort and hang up a call.
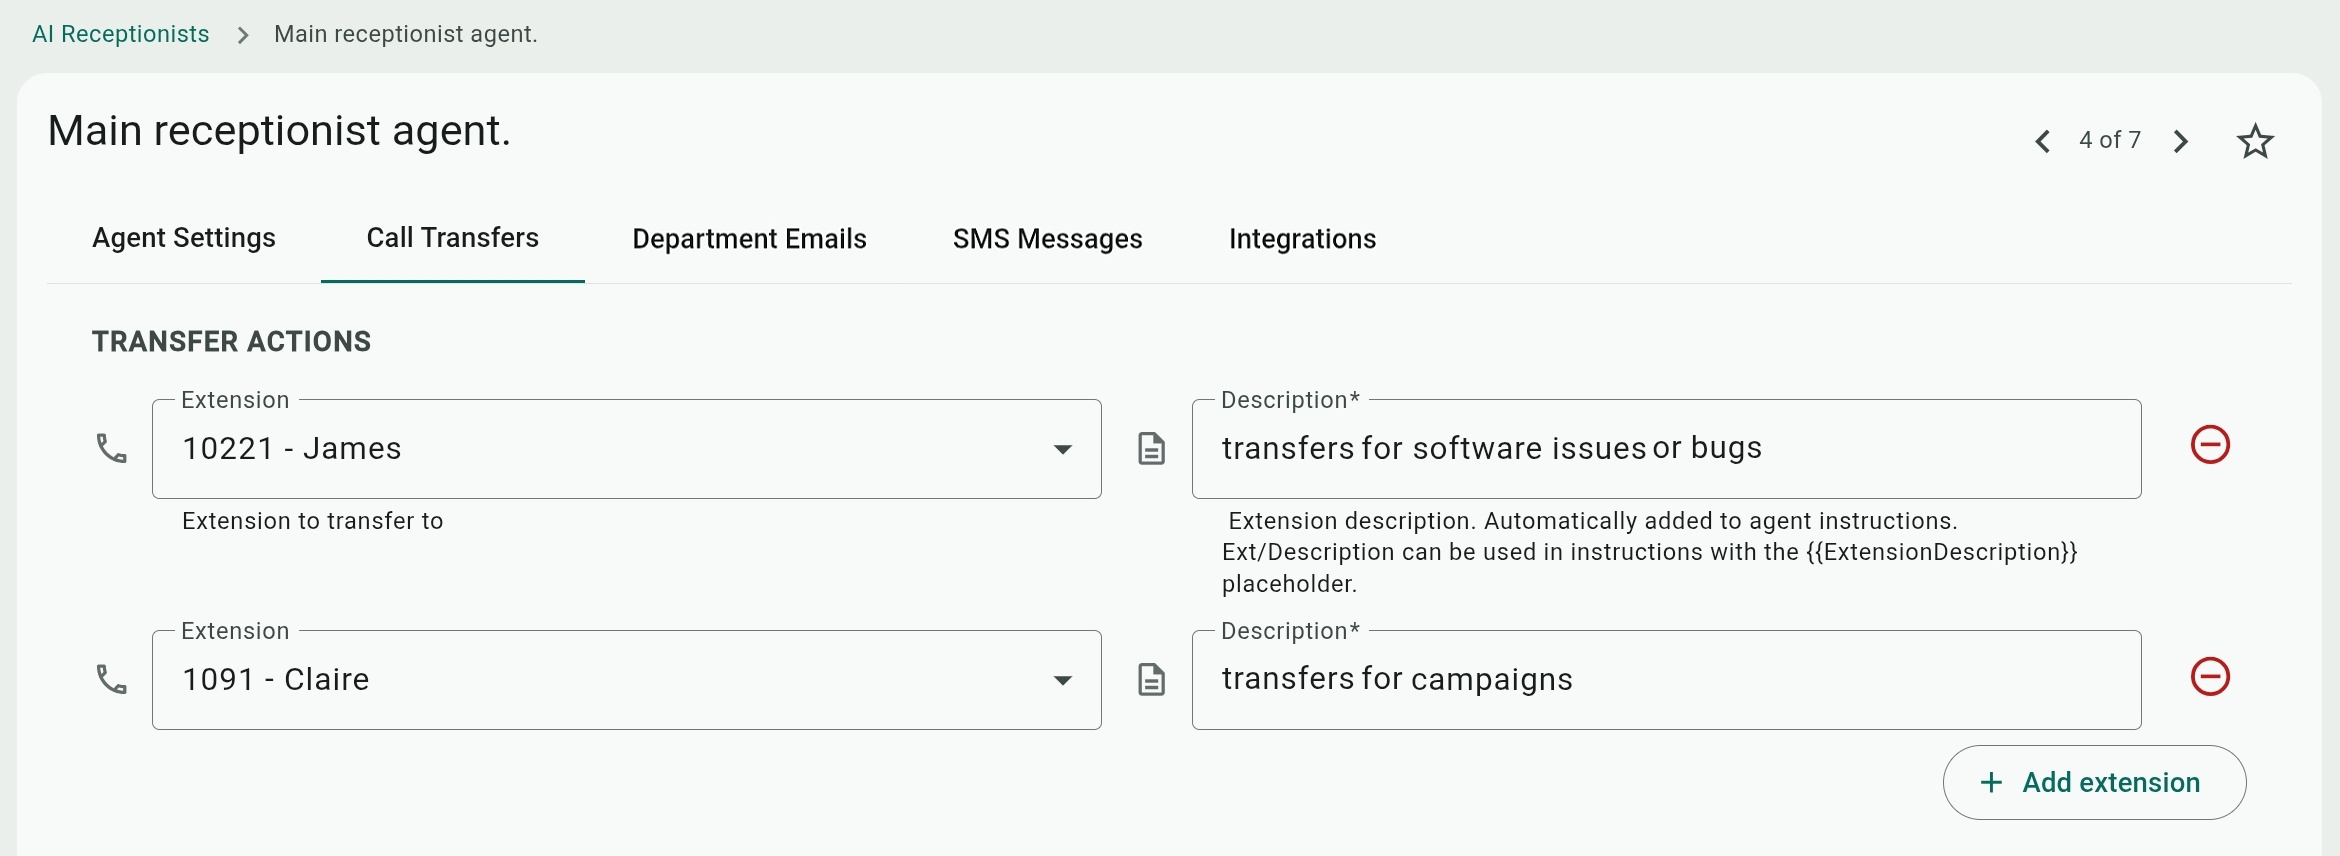
- Extension: Select the extension the AI agent should transfer calls to.
You can add additional transfer extensions as needed with the Add extension button or remove them with .
.
All the listed extensions are available to the AI agent to transfer calls to when the caller asks to escalate to a human or when it cannot handle some aspect of the call. The AI would select the most relevant extension based on its description... - Extension use case: Tell the AI agent the purpose of each extension and how to use it to transfer calls.
You can and should also set general rules and transfer procedures for the agent in the Work Description and Instructions settings.
Department Emails
Describe and set up email addresses for use when the caller asks the AI agent for a later human follow-up (that is not an immediate transfer of the call), to open a support ticket, or just any other reason for emailing a summary of the call.
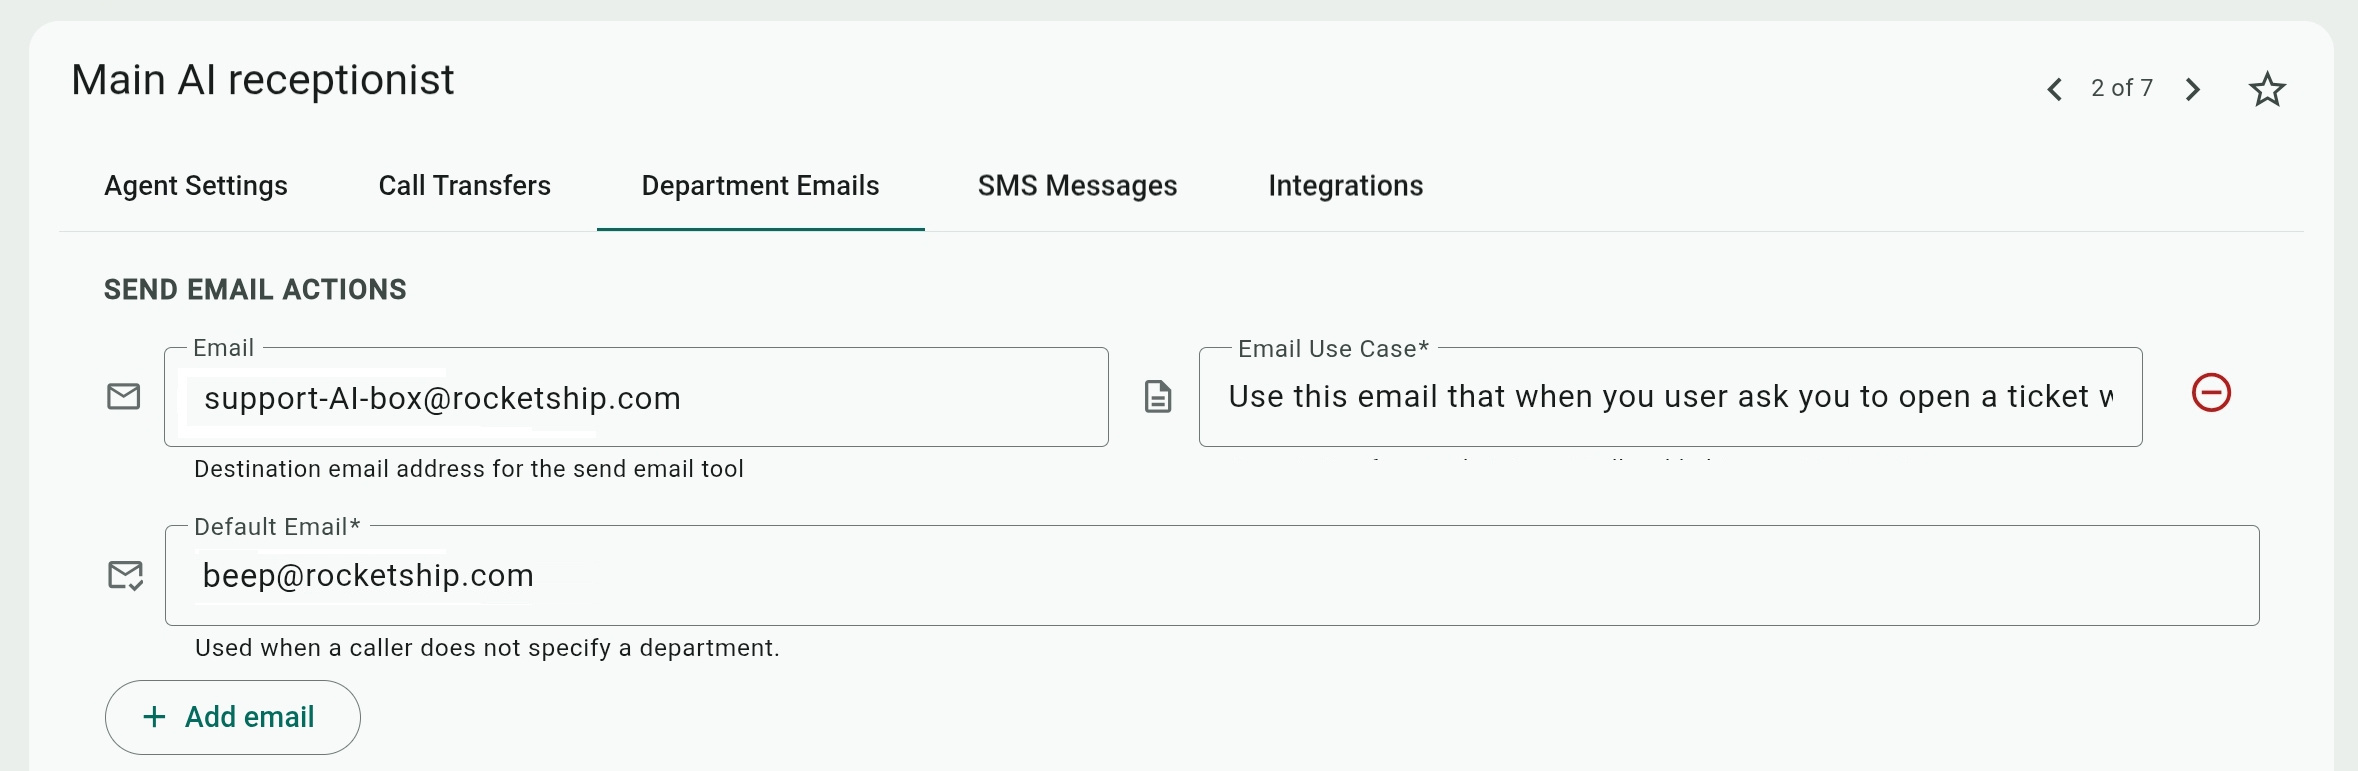
- Email: Enter the address the AI Agent should email.
You can add additional addresses with the Add email button or remove them with .
.
All the listed addresses are available to the AI agent when the caller asks to email a human or open a support ticket. The AI would select the most relevant email based on its "SMS Use Case" field. - Email Use Case: Tell the AI agent the purpose of each email address and how to use it to send emails to different departments or staff members.
You can and should also set rules and general emailing procedures for the agent in the Work Description and Instructions settings. - Default Email: An email address that the AI Agent can use when the required department or staff members are not specifically asked for by the caller or not clearly defined in the conversation with them.
SMS Messages
Describe and set up SMS Actions for the AI agent to send a text message during a call, alerting staff about important interactions with callers, when the caller asks the AI agent for a more immediate human follow-up or assistance that should be requested by SMS notification. 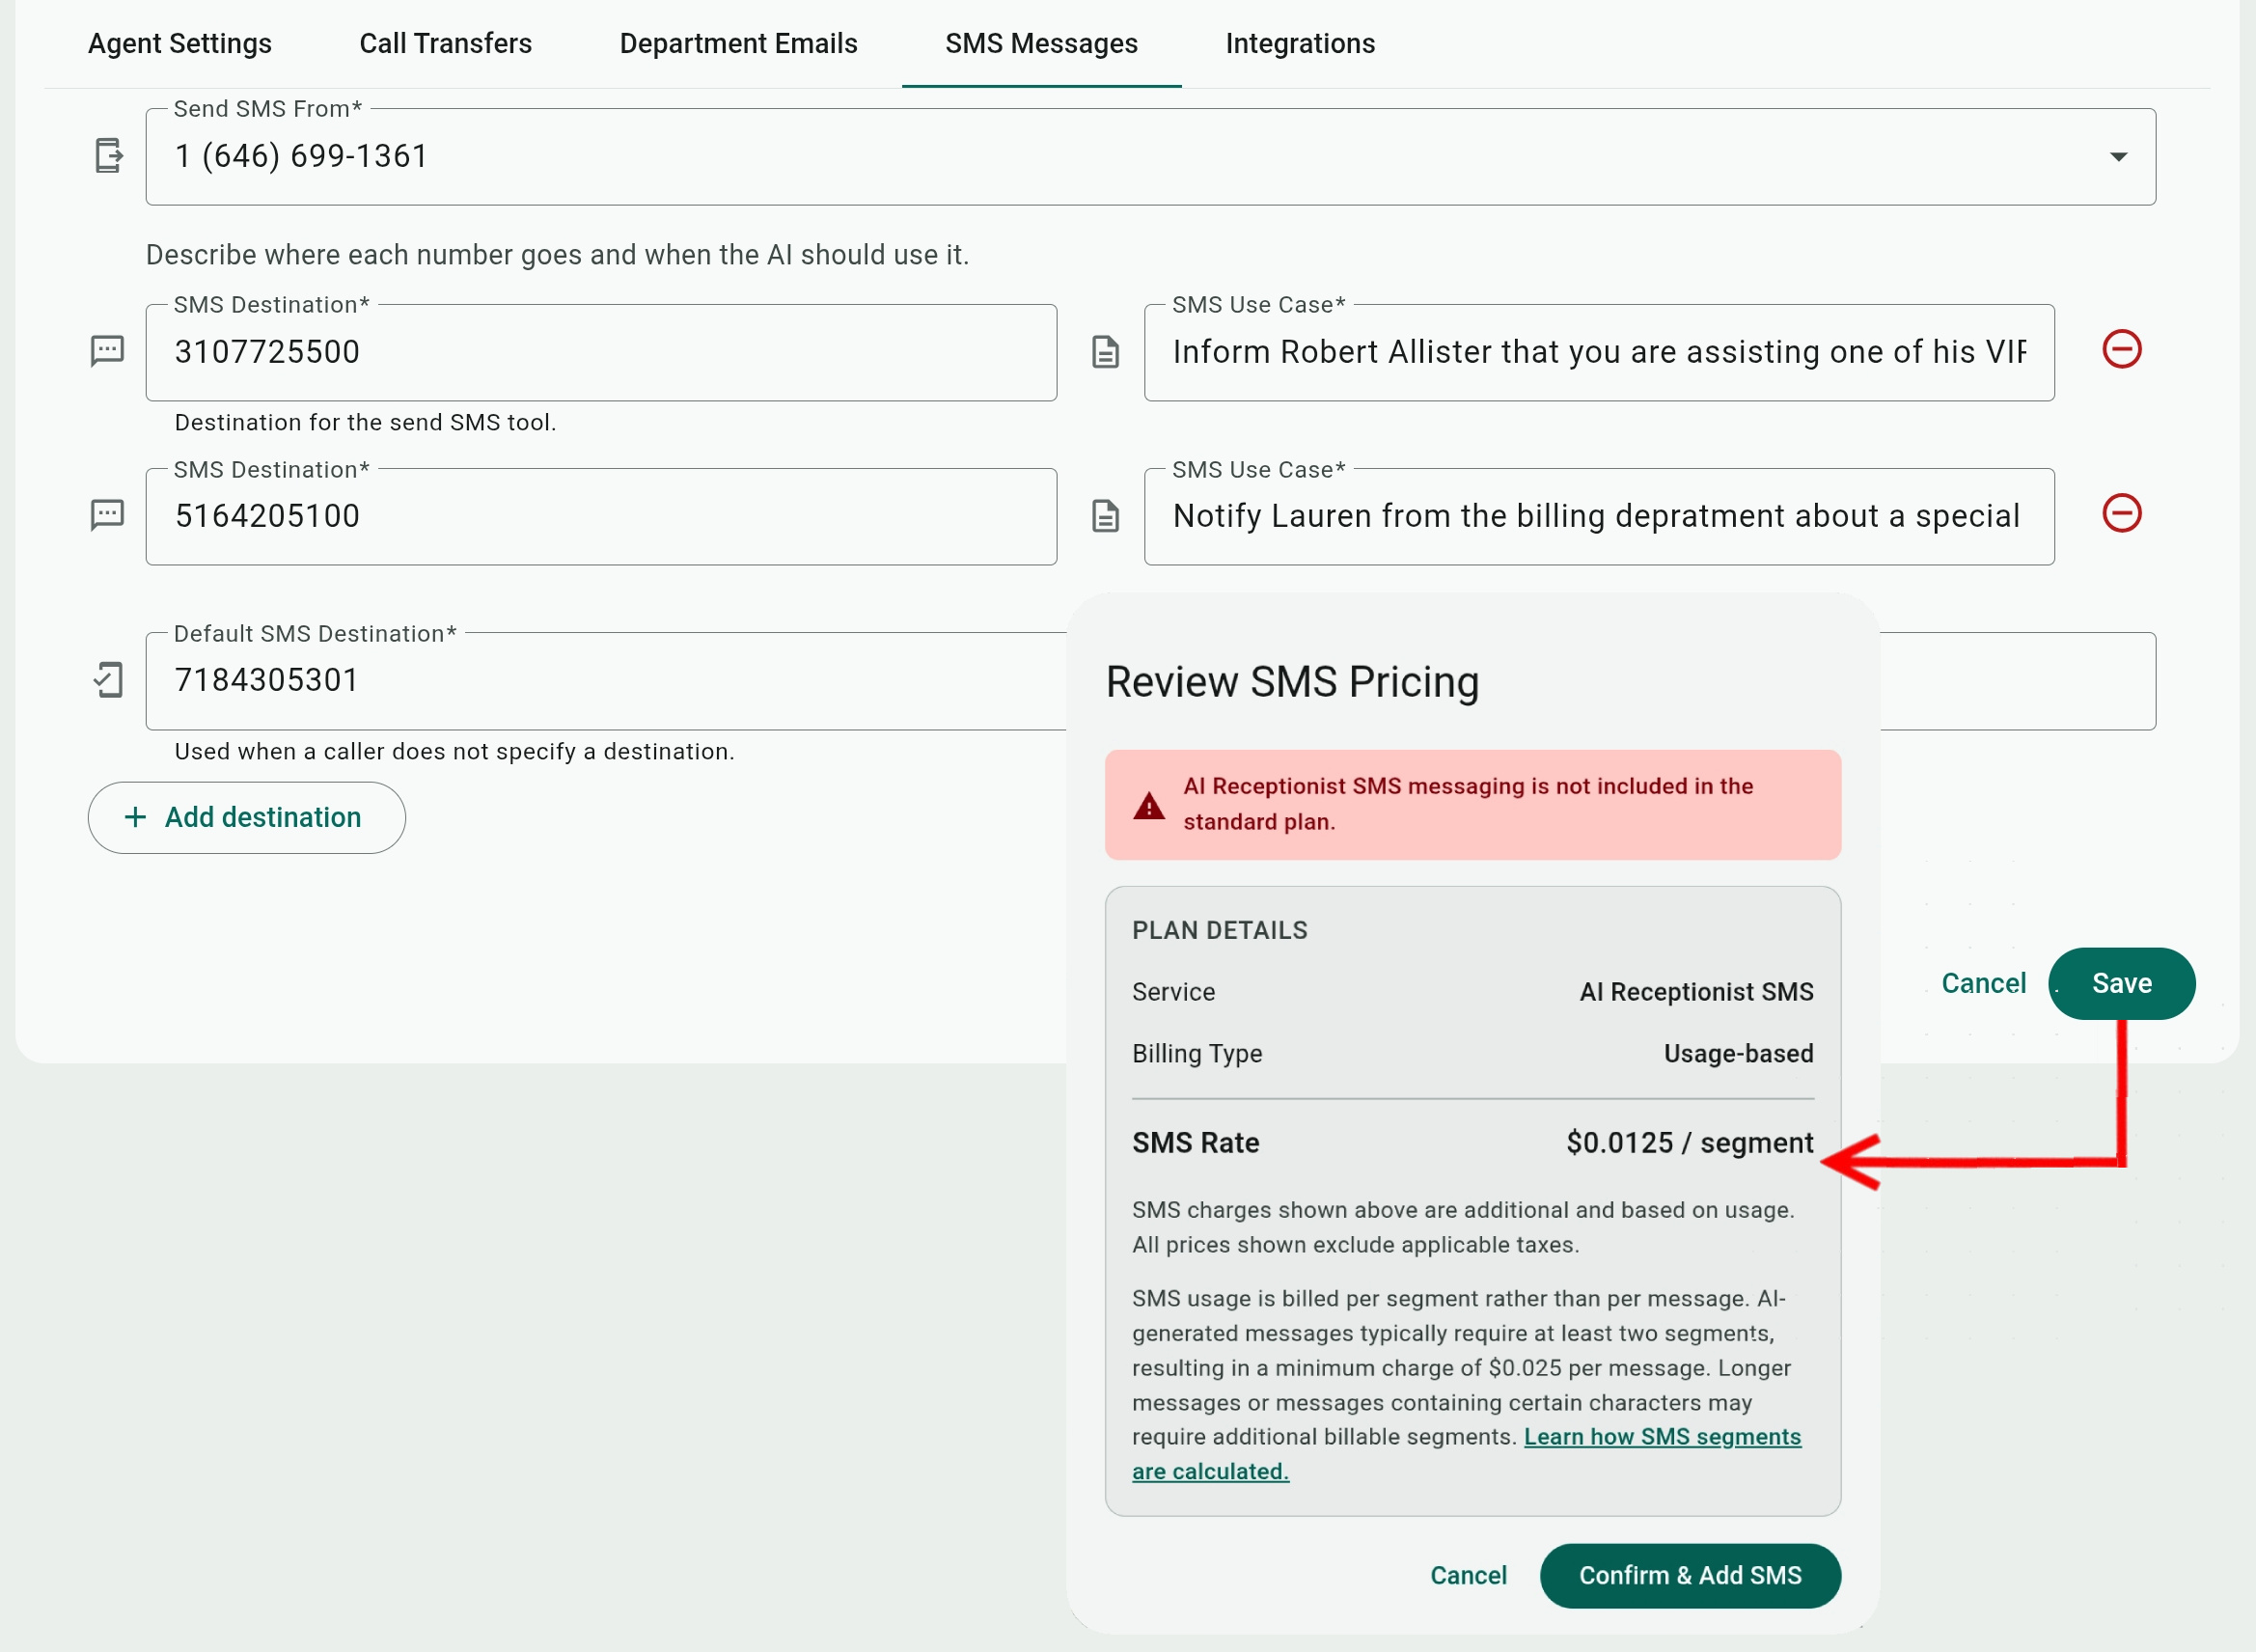
- Send SMS From: Select one of the SMS enabled numbers on the account to deliver the SMS messages from.
- SMS Destination: The phone number to deliver the SMS message to.
You can add additional SMS destinations with the Add destination button or remove them with.
All the listed SMS destinations are available to the AI agent when the caller asks to email a human or open a support ticket. The AI would select the most relevant destination based on the "SMS Use Case" field. - SMS Use Case: Tell the AI agent the purpose of each SMS destination and how to use it to notify staff members about interactions with callers or follow-up requests.
You can and should also set rules and general texting procedures for the agent in the Work Description and Instructions settings. - Default SMS Destination: An SMS number that the AI Agent can use when the required staff members or SMS contacts are not specifically asked for by the caller or not clearly defined in the conversation with them.
AI Receptionists Integrations
The integration feature allows your AI receptionist to go beyond answering questions and perform parallel actions during a live call, like updating records, pulling up information, booking appointments, or triggering processes in external software.
Technically, we refer to AI integrations as functions or tools since they can be called to action and reused.
Types of Integrations
There are two methods to integrate the AI receptionists:
- Custom Function: This can be configured directly in the Admin Center. It requires no coding, but you do need to define all the variables for each function and its communication method with the resource.
- MCP Server: This is a standardized architecture for AI tools that uses the MCP server (configured and operated by the resource owner and running on its domain) as an intermediary and presents the MCP-compatible AI agents with a list of tools they can access and use to interact with the resource.
With limited use cases for Telebroad services, the MCP Server integration is no longer available directly on the Admin Center. If you think MCP Server integration will work better for you, please contact us to discuss your situation, as we can still set it up for you on our backend.
The Integration Resource
Resource is a term that refers to any external software, service, database, files, records, APIs, or any other asset that the integration interacts with to perform an action or retrieve information. While the resource refers to the asset in general, the interaction would usually target specific data properties in it. For example, if a resource is a database of clients, the integration will update a specific client's records (like address) that the AI agent identified during the phone call. It is recommended to keep ongoing backups of the resource if the AI is allowed to modify it!
Viewing and Adding Integrations
You can view all existing integrations by clicking the  button on the main page. Select any integration here to open and edit it.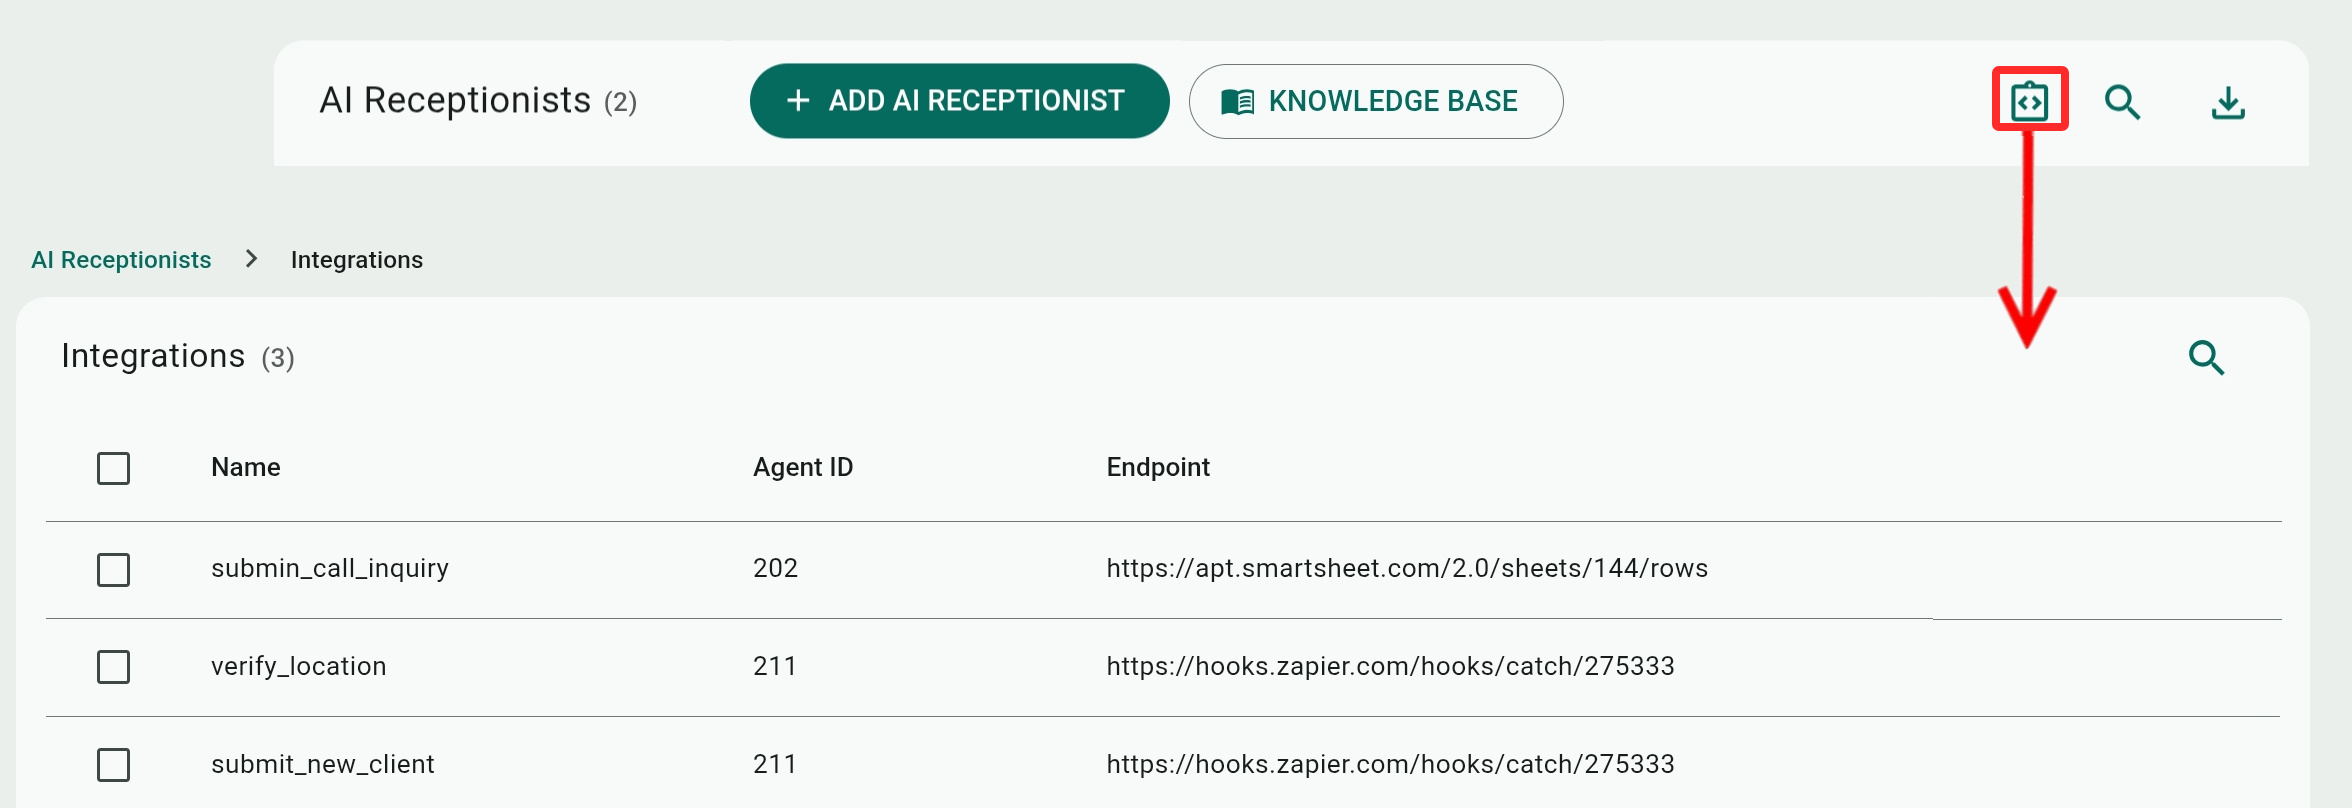
You can also select an existing AI receptionist from the main page and click the Integrations tab to see integration(s) attached to it, delete these integrations, or open them for editing.
Click Create Custom Function to create and attach a new custom function integration to the receptionist (as mentioned above, you can contact us if you need to create an MCP Server integration).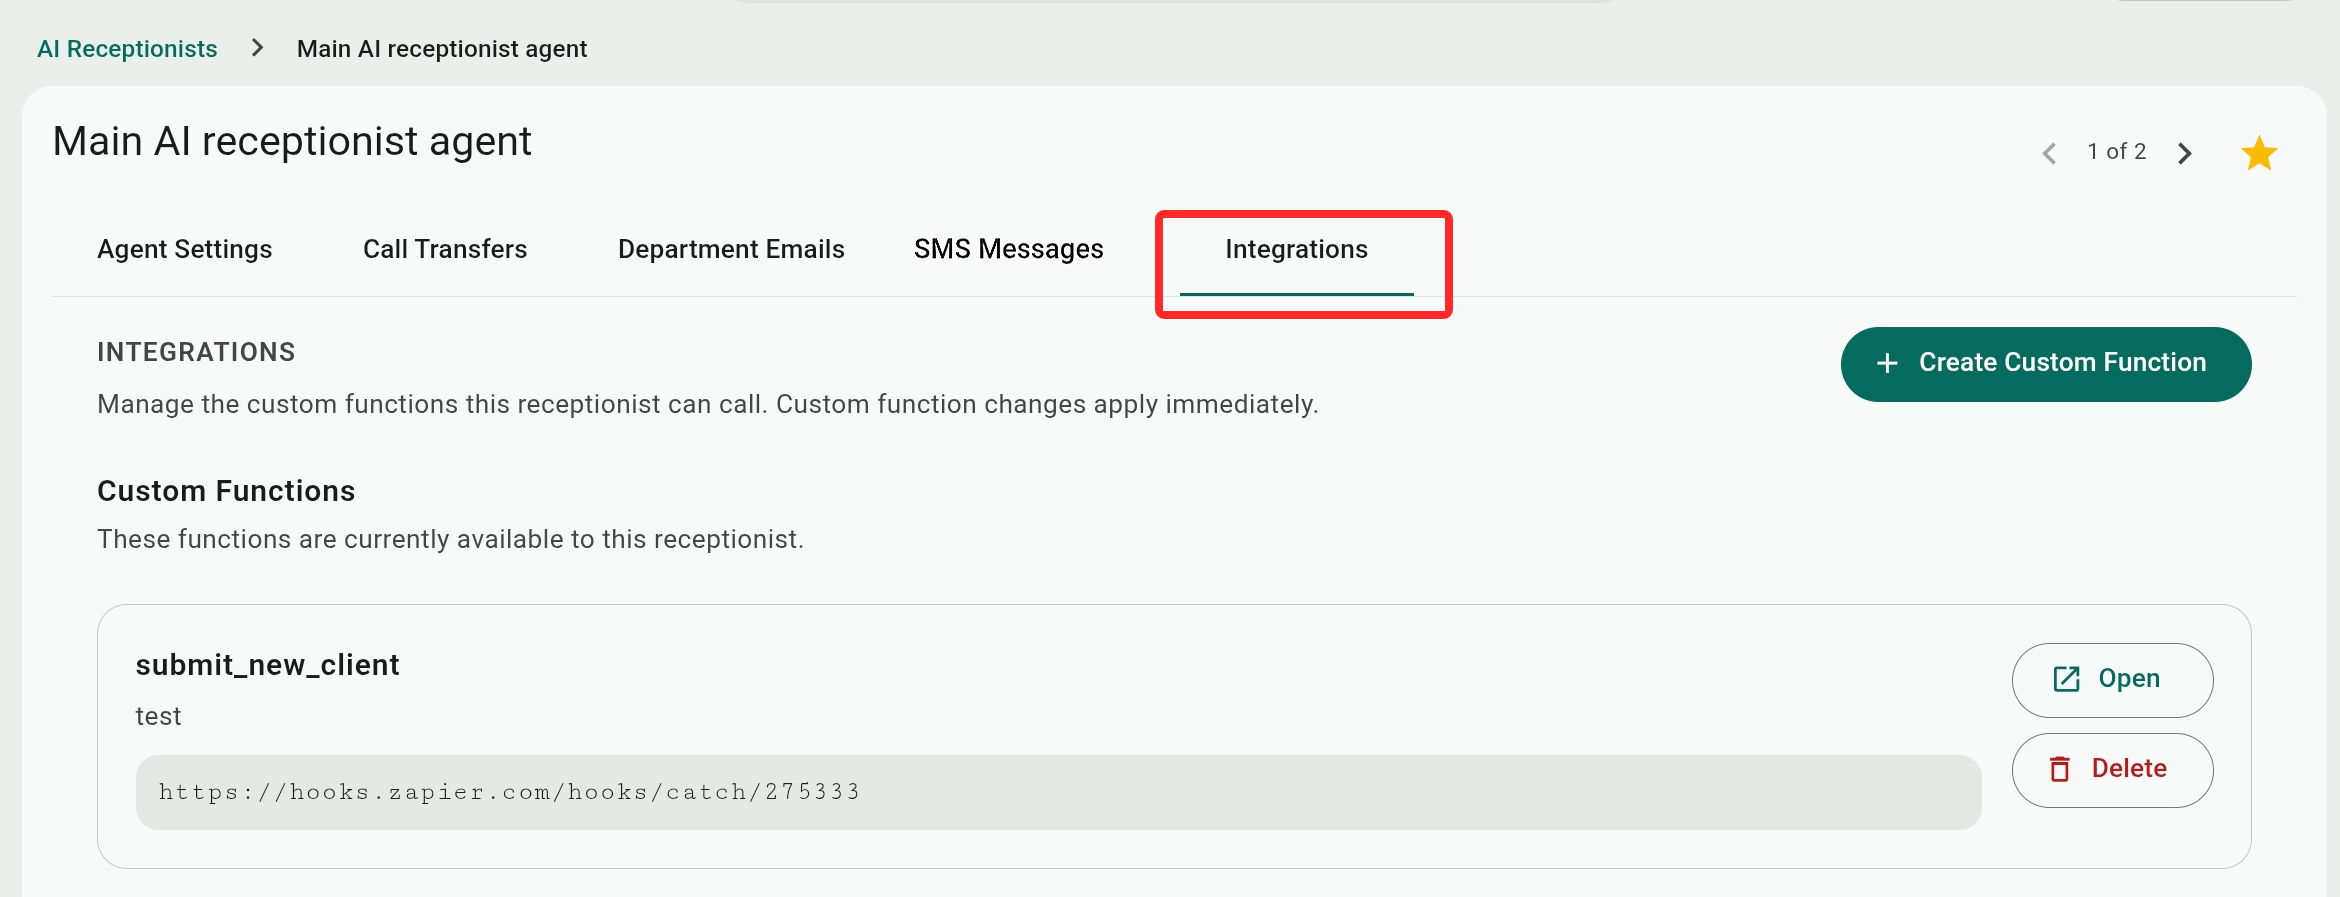
Custom Function Integration Settings
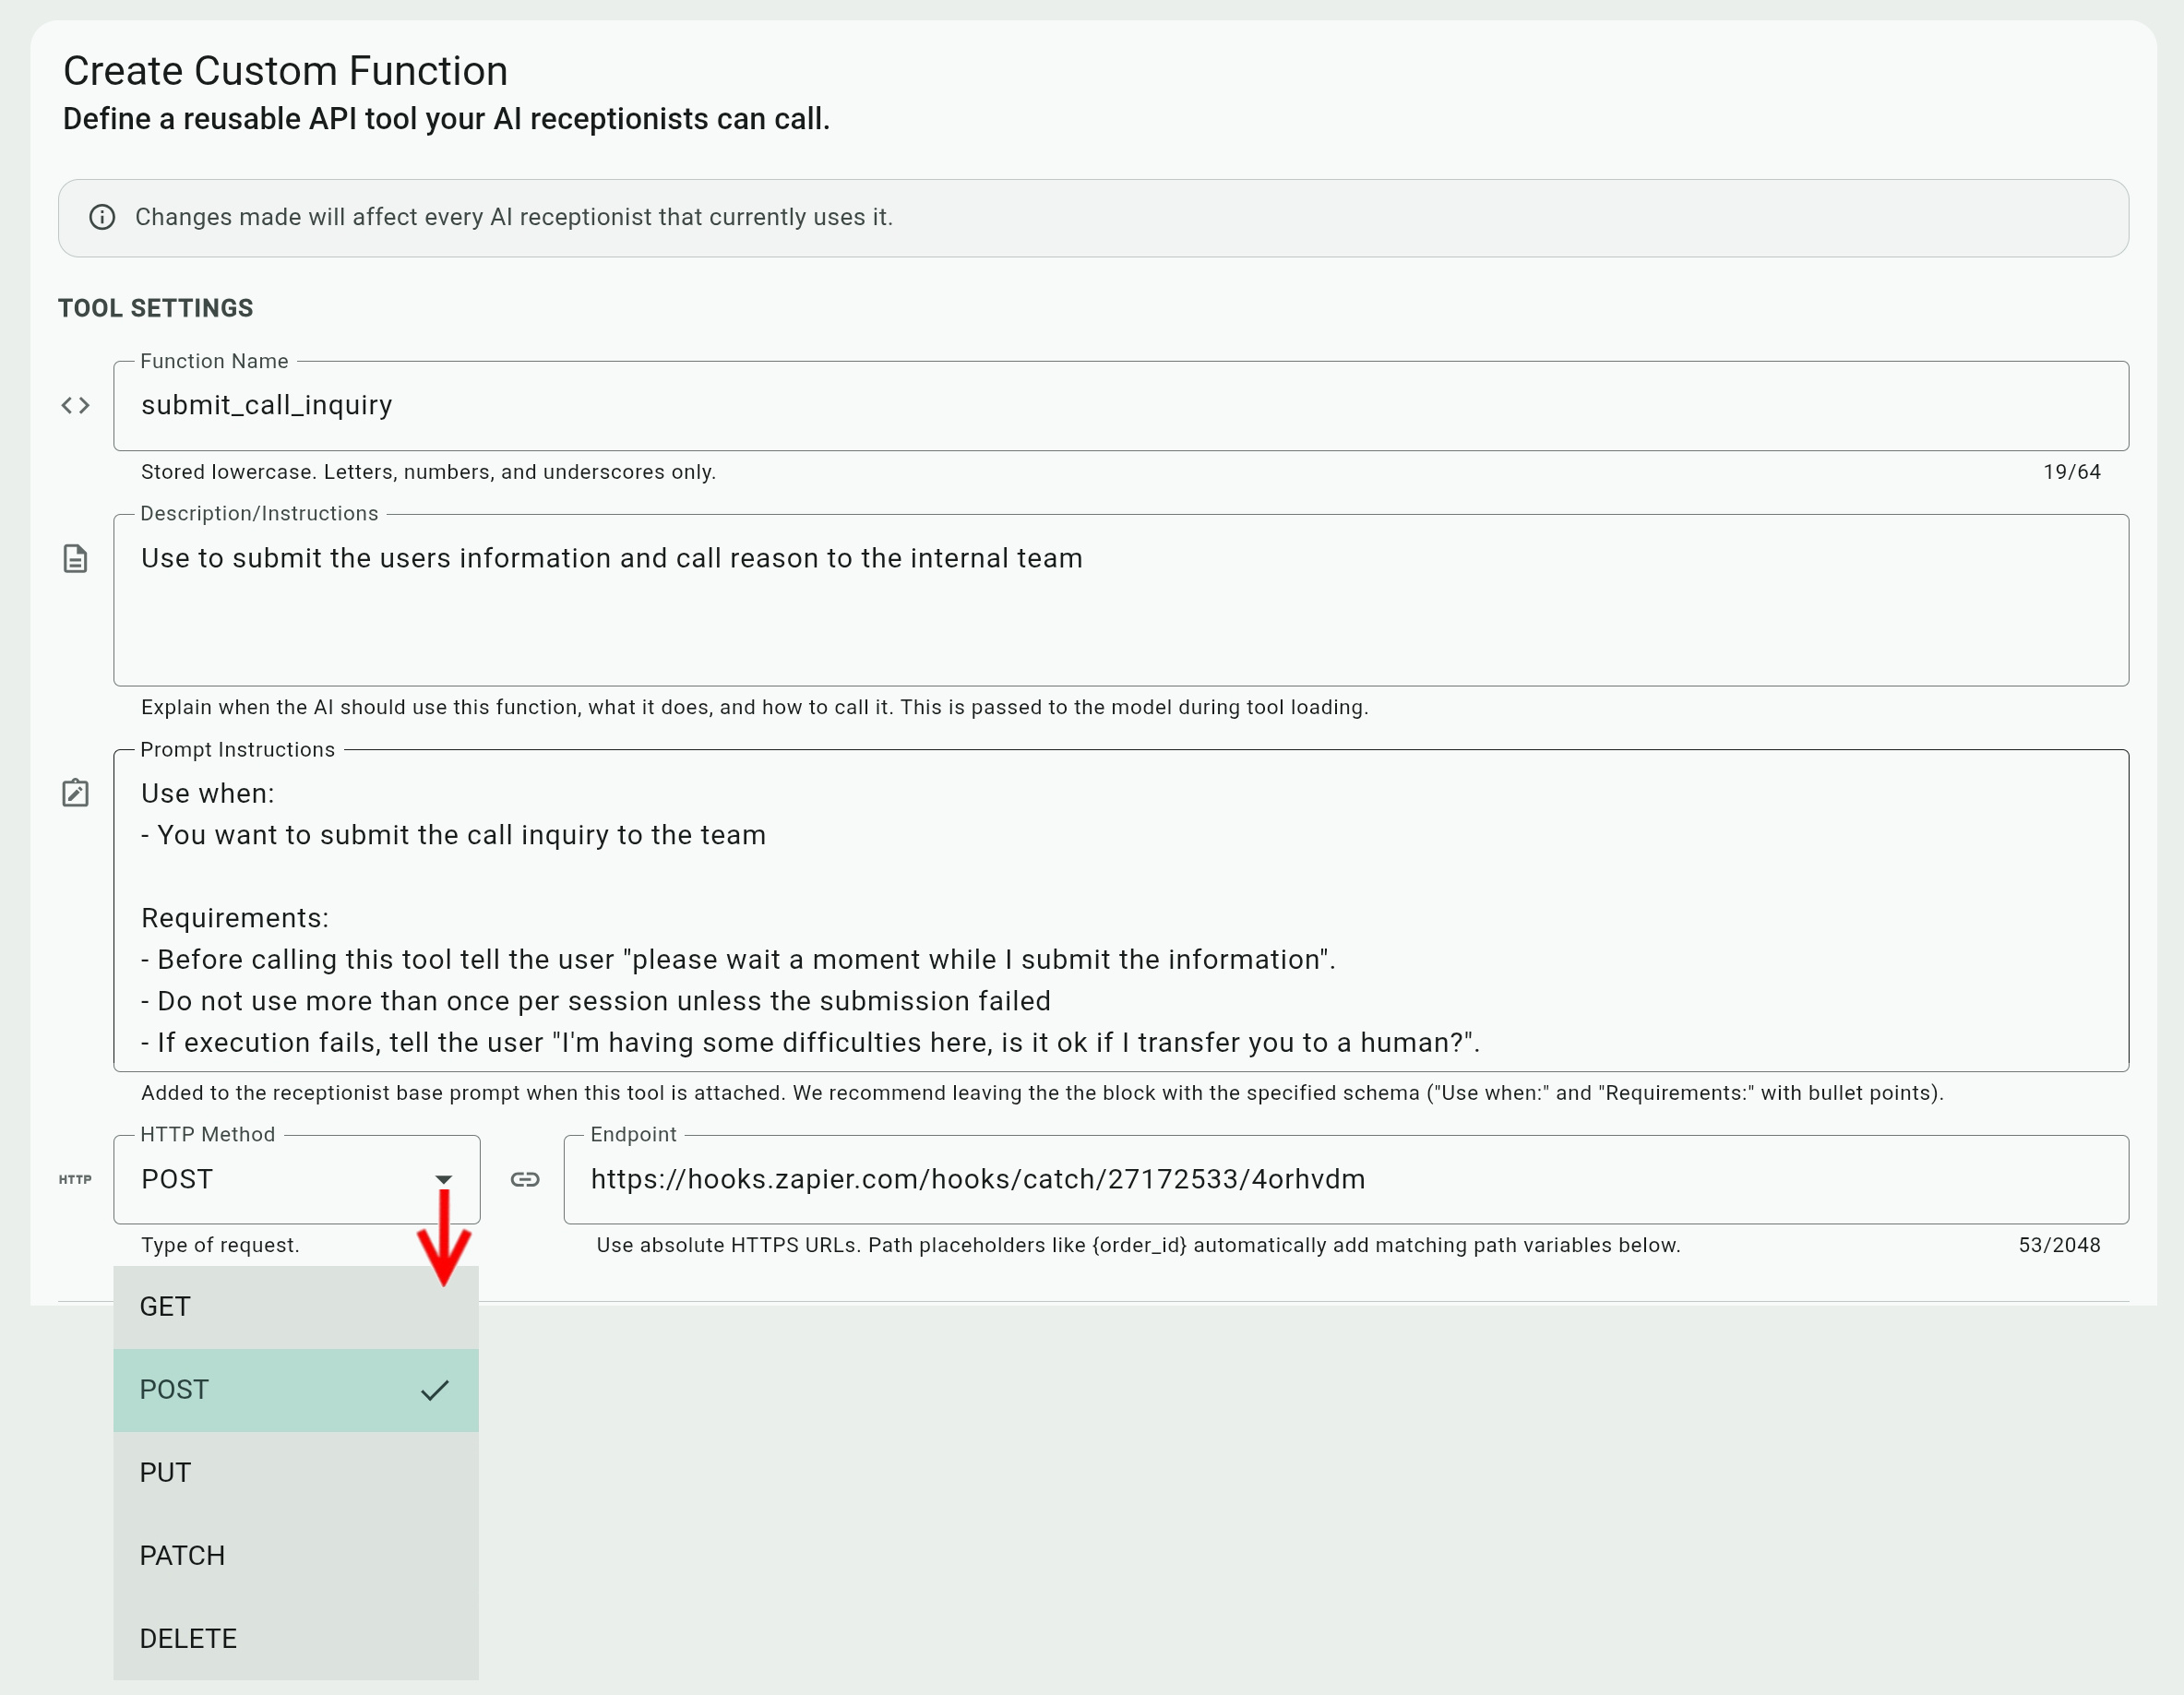
- Function Name: Needs to be lowercase and include only letters and numbers. Use underscores instead of spaces!
- Description/Instructions: This is a general description (base prompt) passed to the AI model when it loads the function, telling it what it does and how to use it.
Unlike the MCP server description or other description fields in the Admin Center, this is not optional and must be included with the tool. - Prompt Instructions: Additional instructions added to the base prompt of how the AI should process the function, giving it more details of what it should say or do in certain scenarios.
It is recommended to format the instruction block keeping the "Use when:" and "Requirements:" headers and bullet points with the sample text you will see when creating a new integration. - HTTP Method: The communication method the AI uses to interact and (possibly) modify properties and resources on the endpoint.
- GET: Retrieve information from the resource without making any data modifications to it.
- POST: Creates new properties on the resource.
- PUT: Updates an entire data set of a resource (like a client's entire profile), replacing it with all the data sent in the body of the request. In other words, this is a complete overwrite of the relevant data, and if the request sent by the AI lacks some fields, it may result in the external server replacing them with blank fields.
- PATCH: Updates only the necessary fields of a resource (like a client's address) with the changed data sent in the body of the request, without affecting the rest of the resource. This is more data-economical and prevents the blank field problem of the PUT method.
- DELETE: Permanently removes properties from the resource.
- GET: Retrieve information from the resource without making any data modifications to it.
- Endpoint: A URL pointing to the resources the AI interacts with to perform the actions of the integration.
You can include any variables (explained next) in the URL by enclosing them in curly brackets and using the & symbol for multiple entries. For example, https://resouce-url.com/process-pdir/{name}&{date_of_birth}.
Custom Function Variables
A custom function can have three kinds of variables that can be attached to the Endpoint URL:
- Body: This is any data that the AI processes, updates, or creates on the resource. For example, we can have a "Topic" variable that the AI will fill in with the reason a client called about.
The Body variable is not applicable when using the GET HTTP method. - Header: Header variables can provide additional metadata to the function, such as format and content definitions, agent identification, tracking and proxies, protocol, and many more properties.
However, the most common use is providing authentication credentials to access the resource. For example, a bearer token "Bearer utitmdewe31631trdewgfi", and in which case you should enable the Secret value toggle to hide the value after saving it. - Query: Query variables are used when the AI needs to obtain additional information from the resource to answer a caller's questions.
For example, if a client calls to ask for a discount on subscription renewal, we can have query variables for the AI to check their current plan, remaining months on it, and if they have any outstanding balance. The tool's prompt instructions will have several lines to calculate the discount accordingly.
Note that if you delete ( ) a variable, you also need to Save the function before the variable gets completely removed.
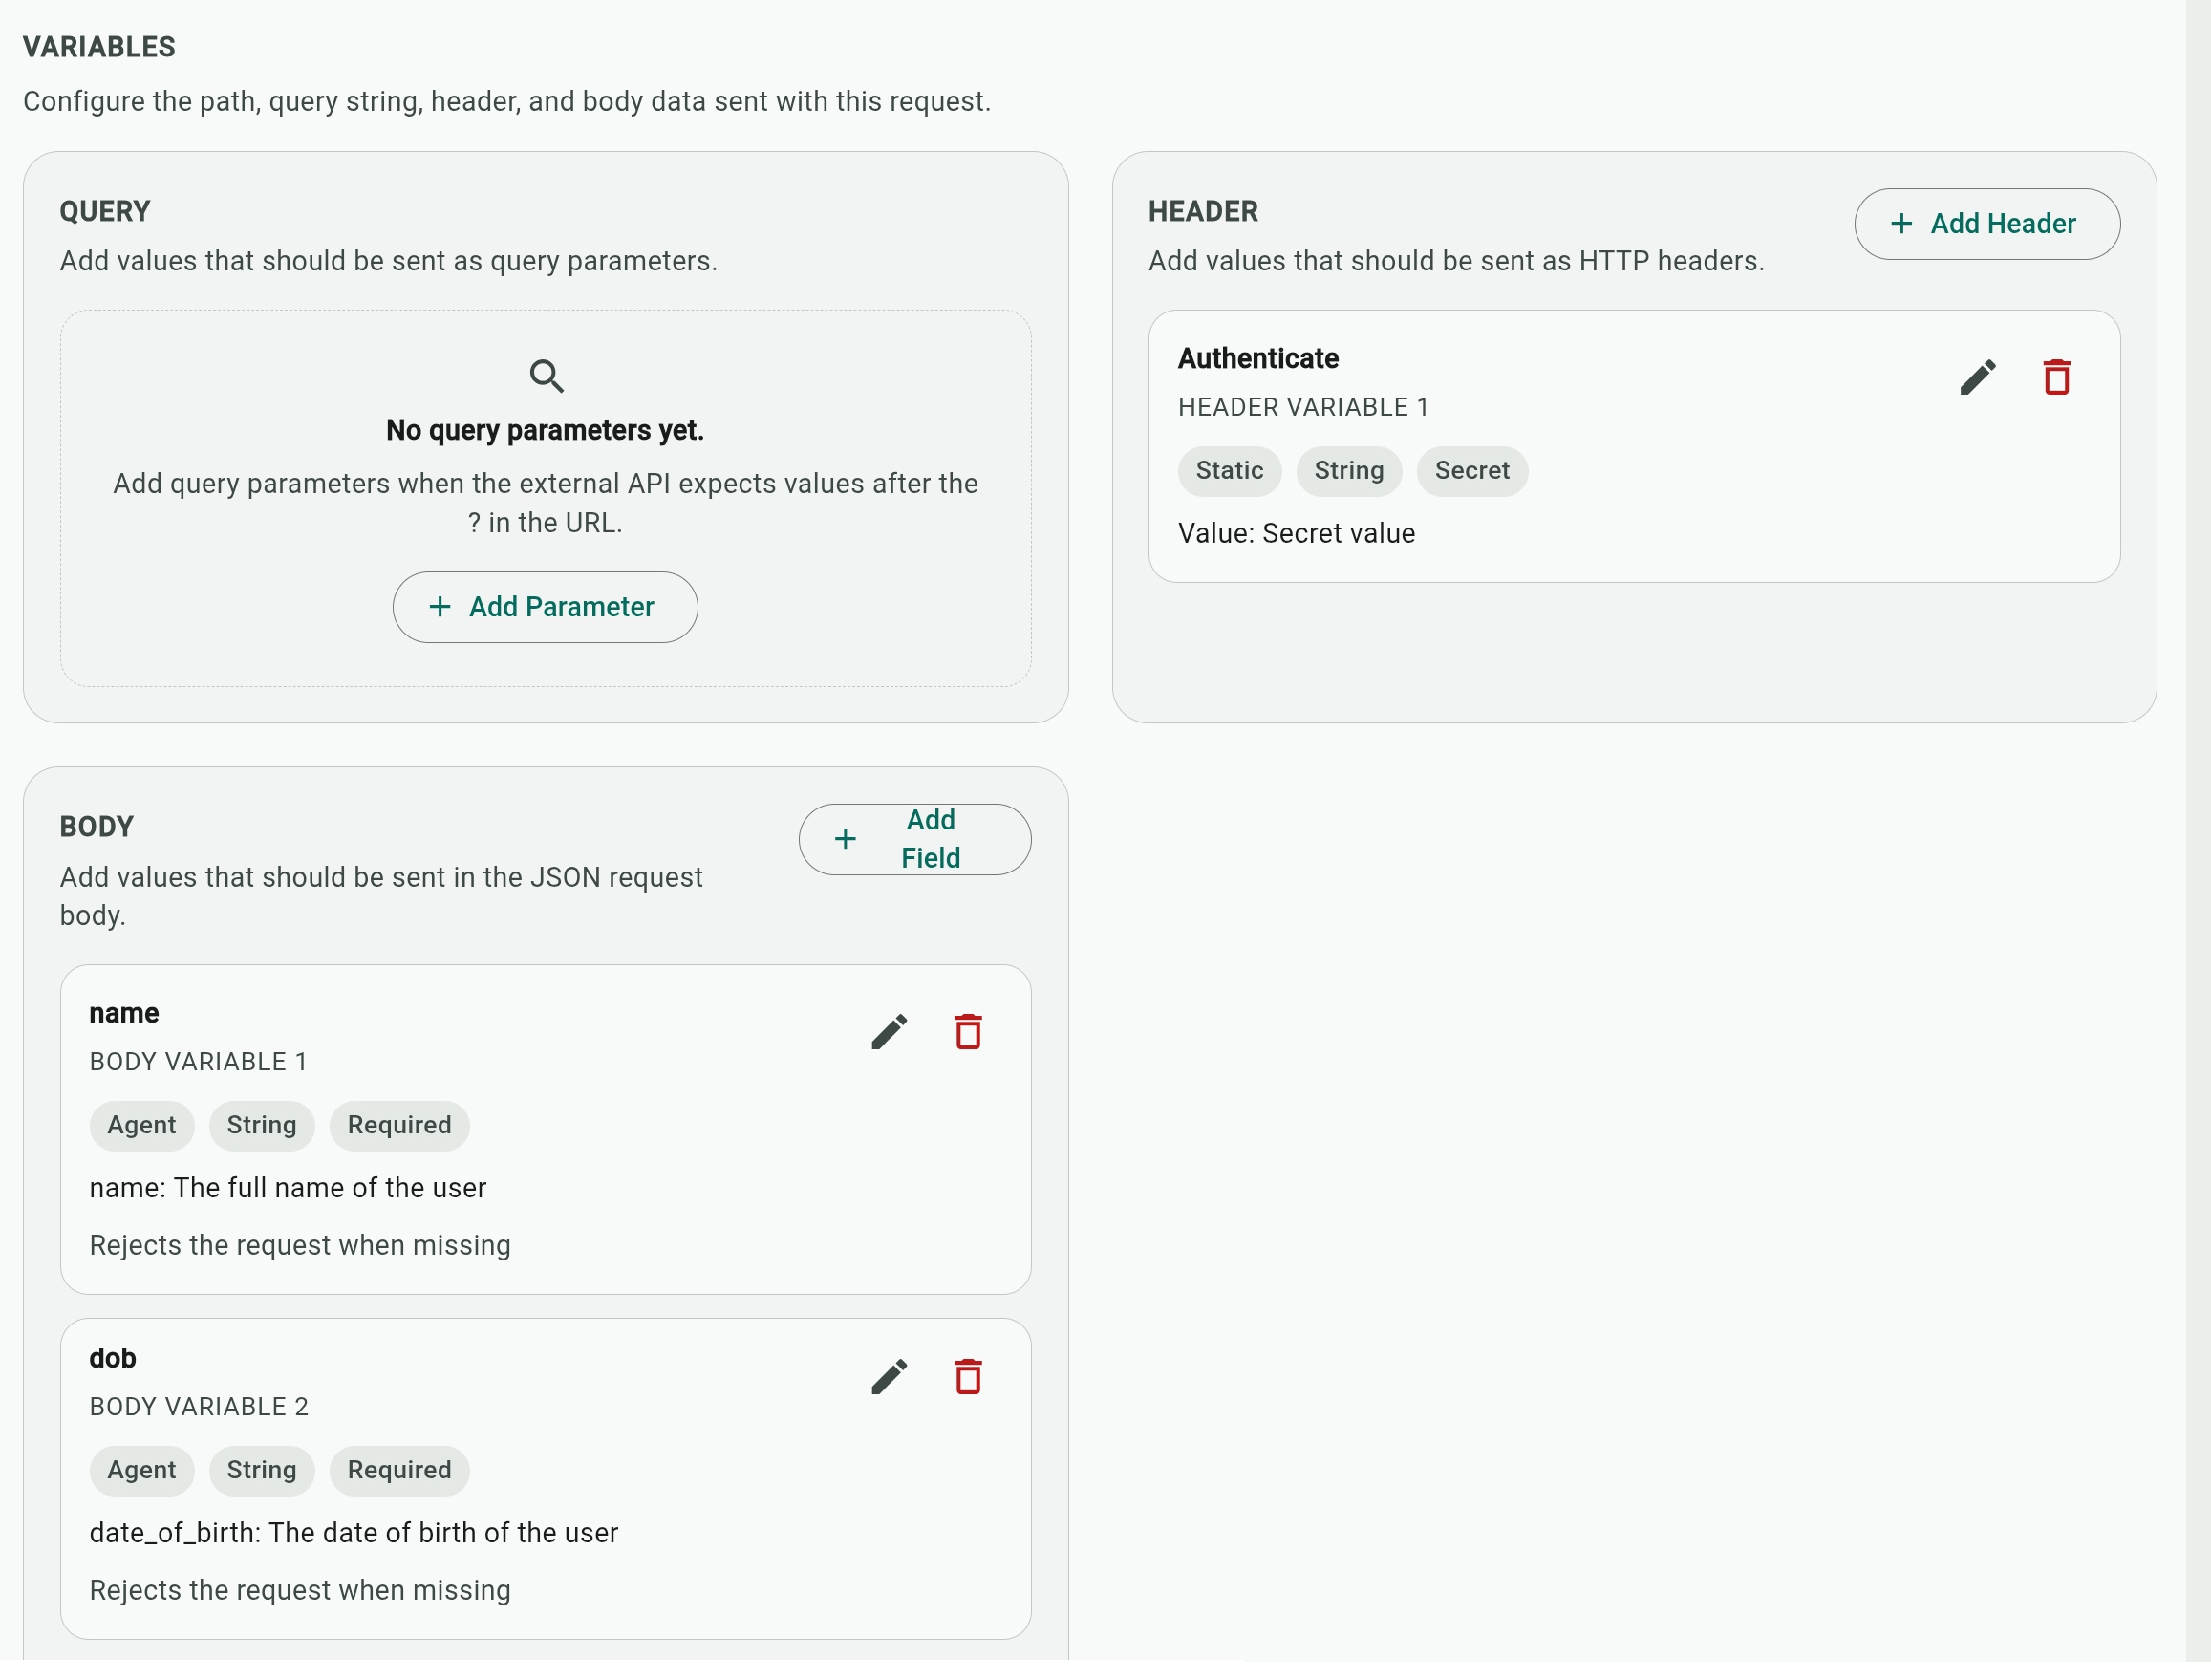
Static and Agent Variables
When adding variables, the Source option determines how values are assigned to them.
- Static: This is a predefined value that you provide, like an authentication token.
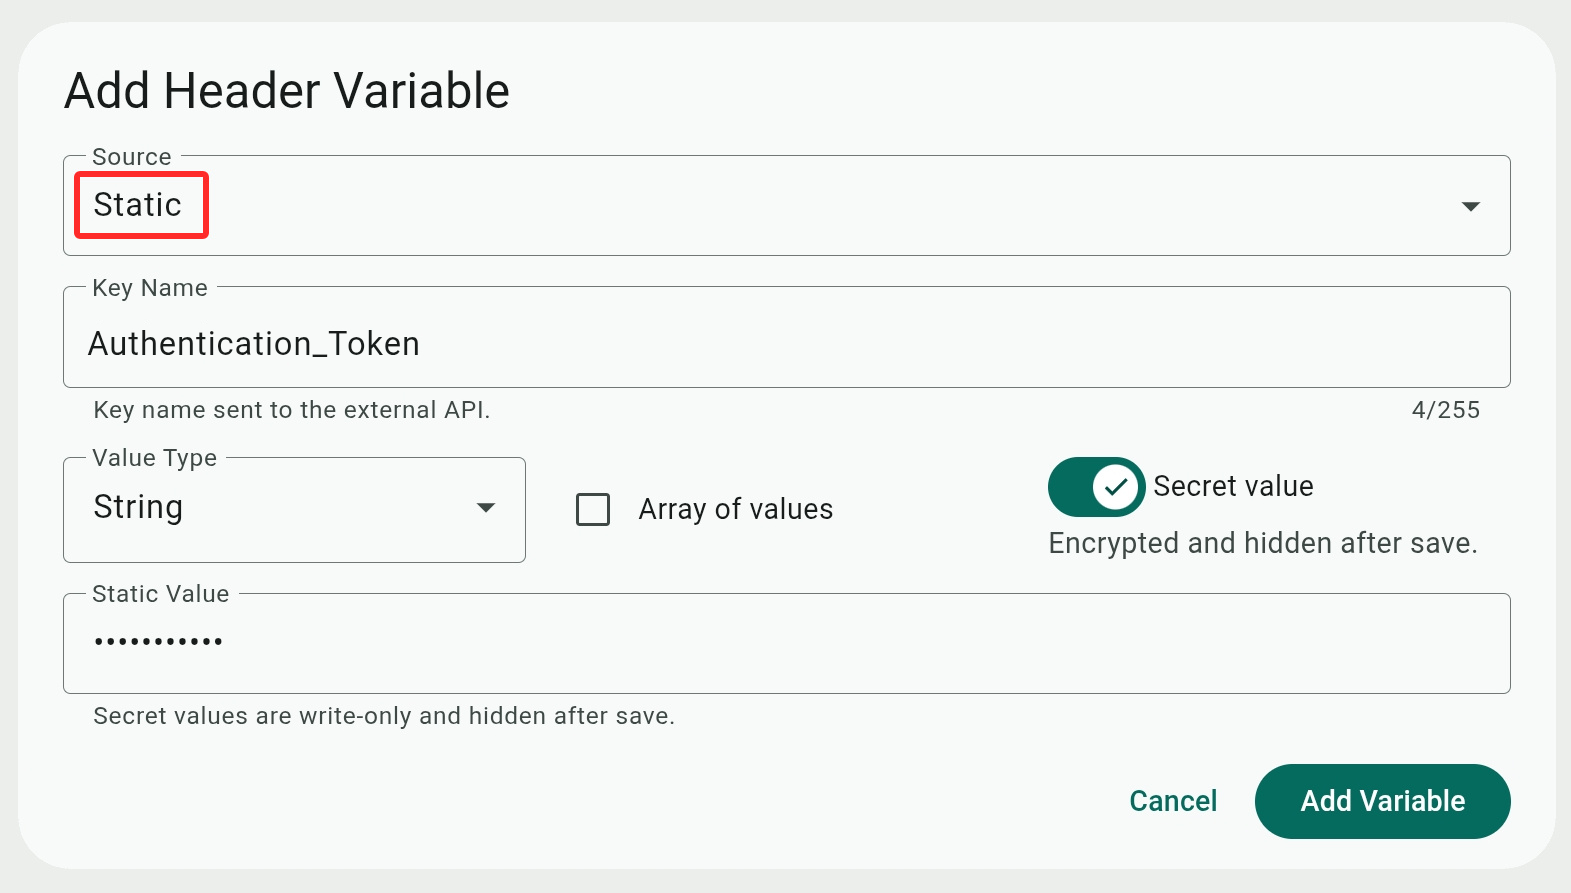
- Key Name: A label that identifies the variable and the value it contains. It can be referenced in prompt instructions and, using curly brackets, can be included in the Endpoint URL.
While not required for static values, descriptive names would help the AI understand better how to process the variable. - Value Type: Specify the data type of the variable as either a String, a Number, an Integer, or a Boolean.
- Array of values: Checking this box defines the variable as an array containing multiple values. Press Enter or Comma to add each value in the Static Value box.
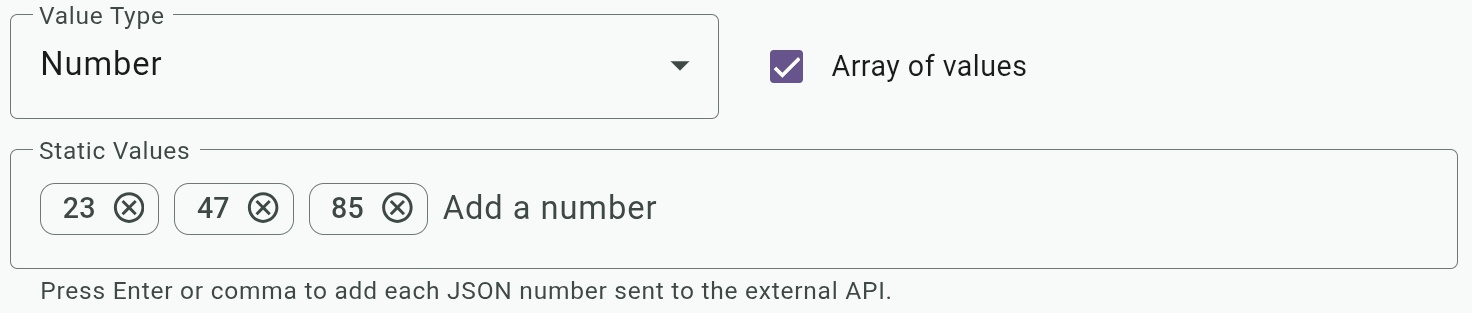
- Static Value: The value contained by the variable that is delivered to or fetched from the resource. Make sure it matches the value type; for example, a Boolean variable can have a "true" or "false" static value.
- Secret Value: Toggle this on to hide the value in the Static Value box, especially relevant to passwords and authentication data.
- Key Name: A label that identifies the variable and the value it contains. It can be referenced in prompt instructions and, using curly brackets, can be included in the Endpoint URL.
- Agent: This is a value that the AI fills in dynamically based on the conversation, for example a client's location or area code.
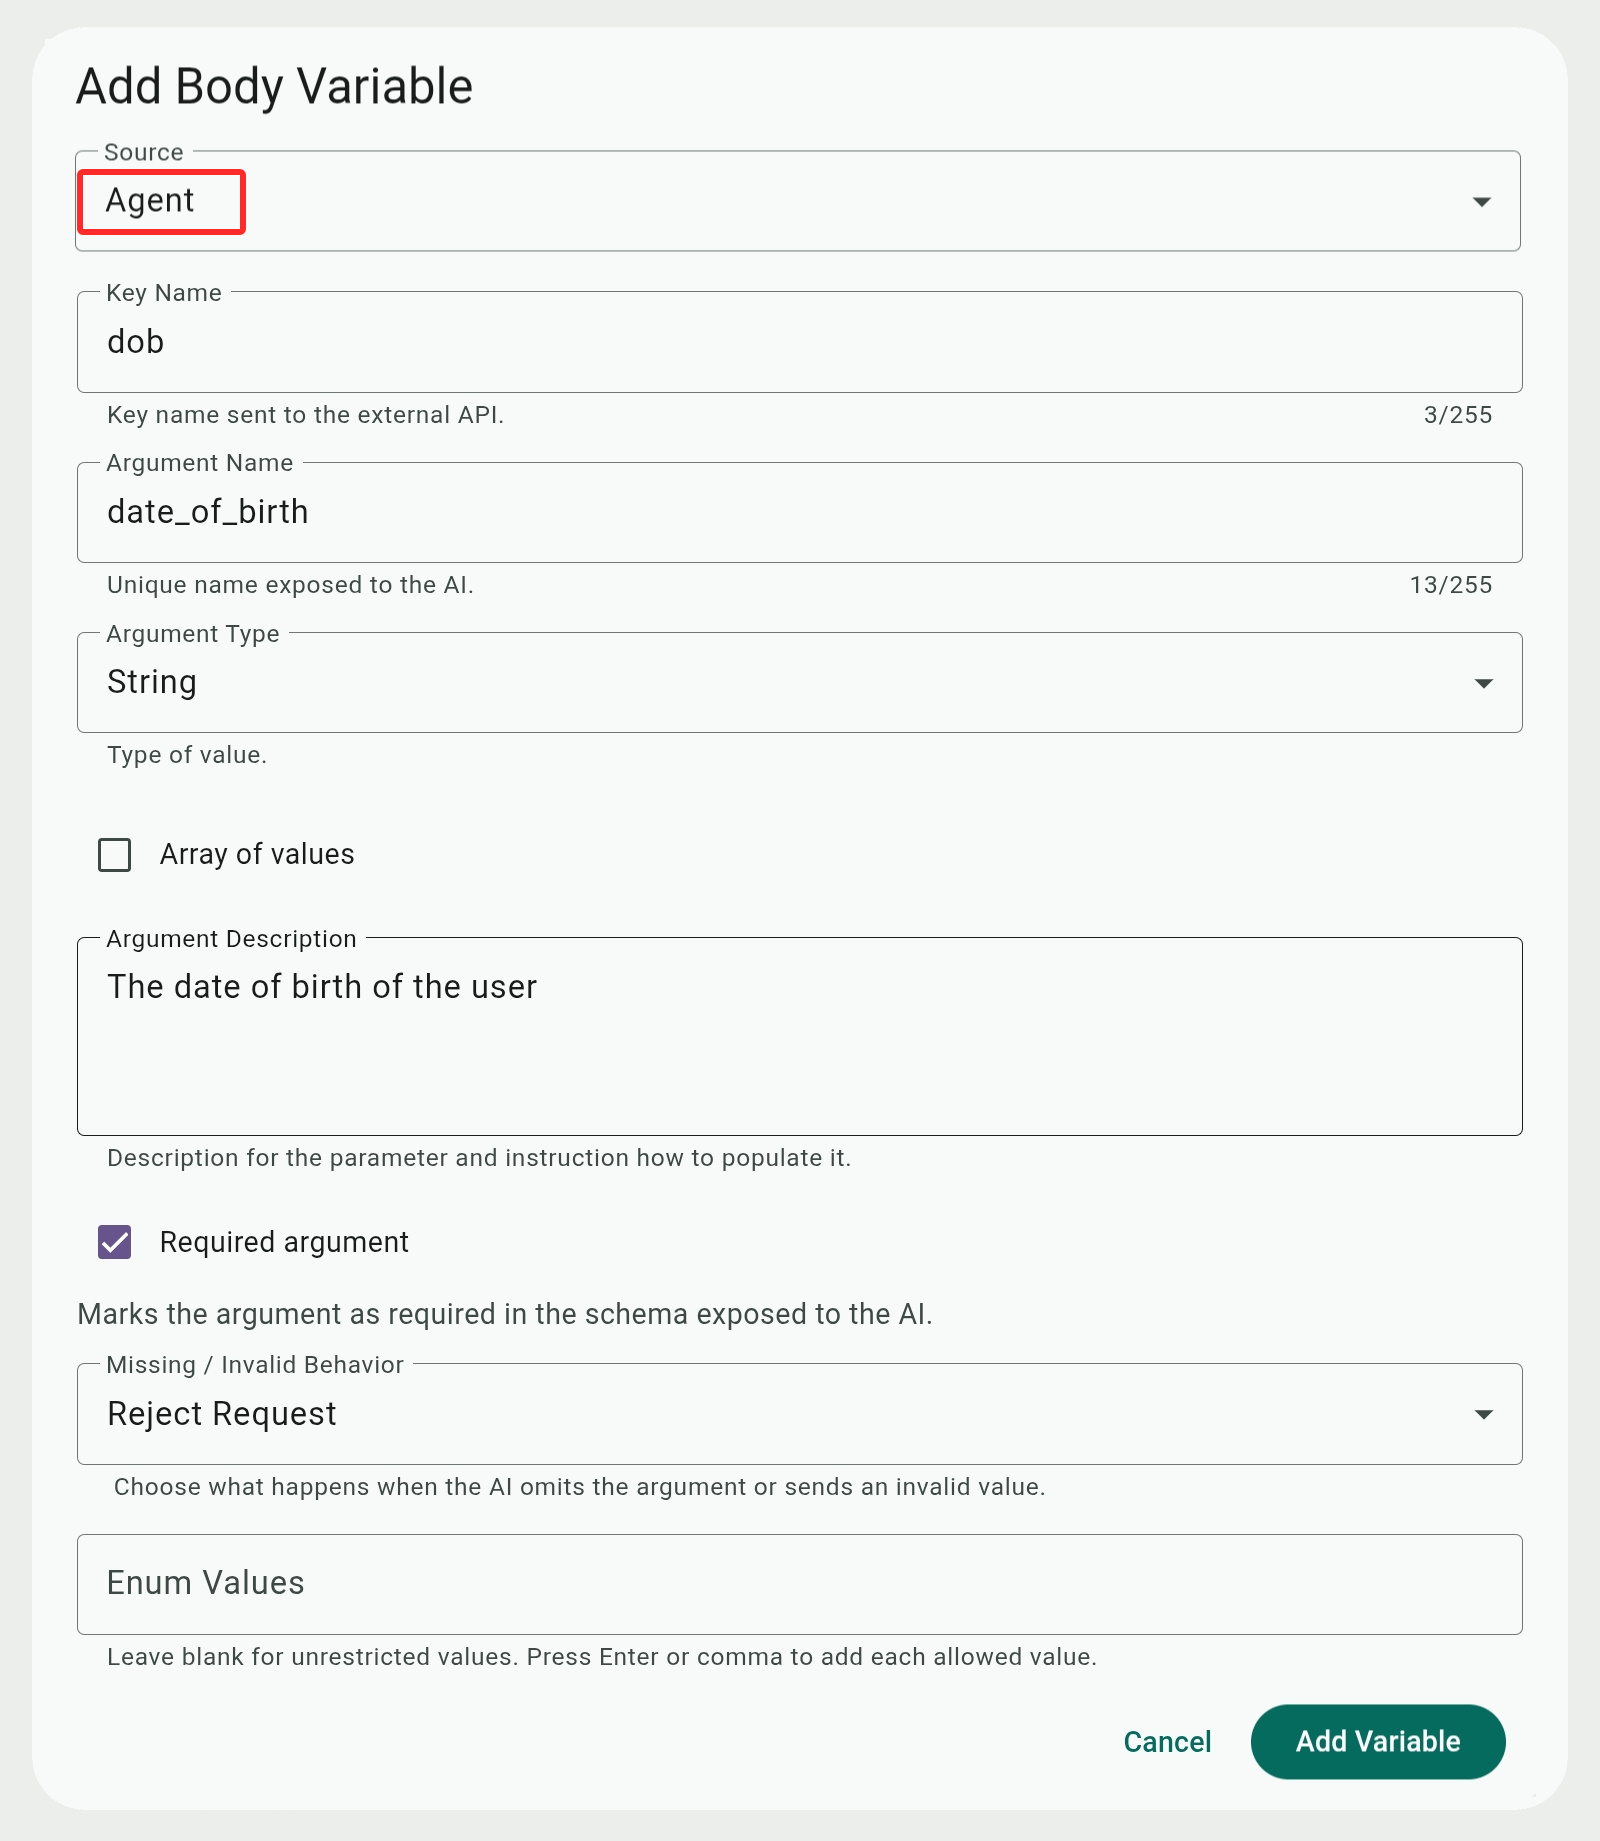
- Key Name and Argument Name: The key name is a label that identifies the variable and the value it contains, while the Argument Name is a label for the Argument Description.
- Argument Type: Specify the data type of the argument as either a String, a Number, an Integer, or a Boolean
- Argument Description: Instructions for the AI about the meaning of the variable and how to assign value(s) to it.
- Array of values: Checking this box lets the AI define the variable as an array containing multiple values.
- Max values: (optional) Limits how many values the AI can include in the array.
- Required argument: Marking an argument as required tells the AI it must obtain a value for the variable before it can process the integration function.
- Missing / Invalid Behavior: Tell the AI what to do when it can't properly process and populate the variable or if the variable contains an invalid value.
You can tell the AI to Send Empty Value instead or Omit Field to make the AI ignore the variable when processing the function.
Selecting Reject Request tells the AI not to proceed with processing the function. You should include directions in the Prompt Instructions field to tell the AI what to do in such a case.
You can also select Use Default Value to replace the value with the content of the Default Static Value field. - Enum values: Let you define a list of allowed values that the AI needs to select from. It is applicable when a variable can contain some distinct values and can be useful for preventing erroneous value assignment.
For example, if we have a Subscription_type variable, we can limit the AI to make a selection only from these values –
- Key Name and Argument Name: The key name is a label that identifies the variable and the value it contains, while the Argument Name is a label for the Argument Description.
Working with Smartsheet
Smartsheet is a cloud-based platform centered around a spreadsheet environment that also offers tools for project management and tracking team collaboration.
Smartsheet is currently supported as an AI Receptionist integration for adding new data rows using the POST method.
Elsewhere in the Admin Center, Smartsheet can also be used by the Flows advanced call routing feature.
To use a Smartsheet account as a resource for the integration, enter this URL in the Endpoint field –
https://api.smartsheet.com/2.0/sheets/<id>/rows
The <ID> is the ID number of the targeted worksheet and can be obtained from the sheet's properties.

You will also need to configure access to the Smartsheet account by adding a static header variable named "Authorization" and setting its value to "Bearer <token>" (replace <token> with your Smartsheet access API key). Make sure to mark the value as secret so that it is not exposed.
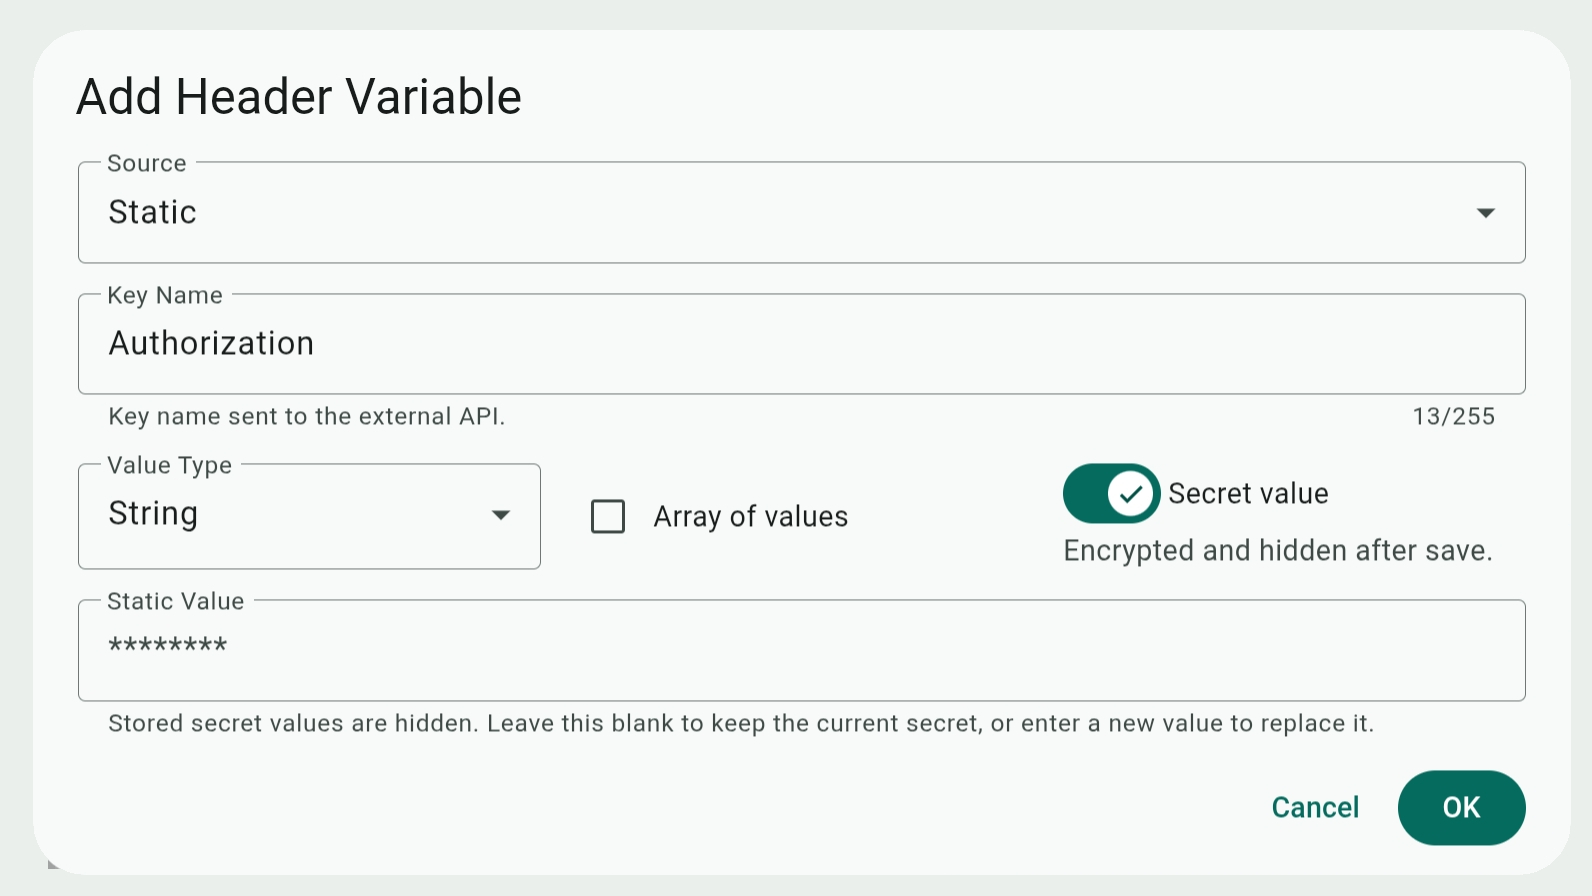
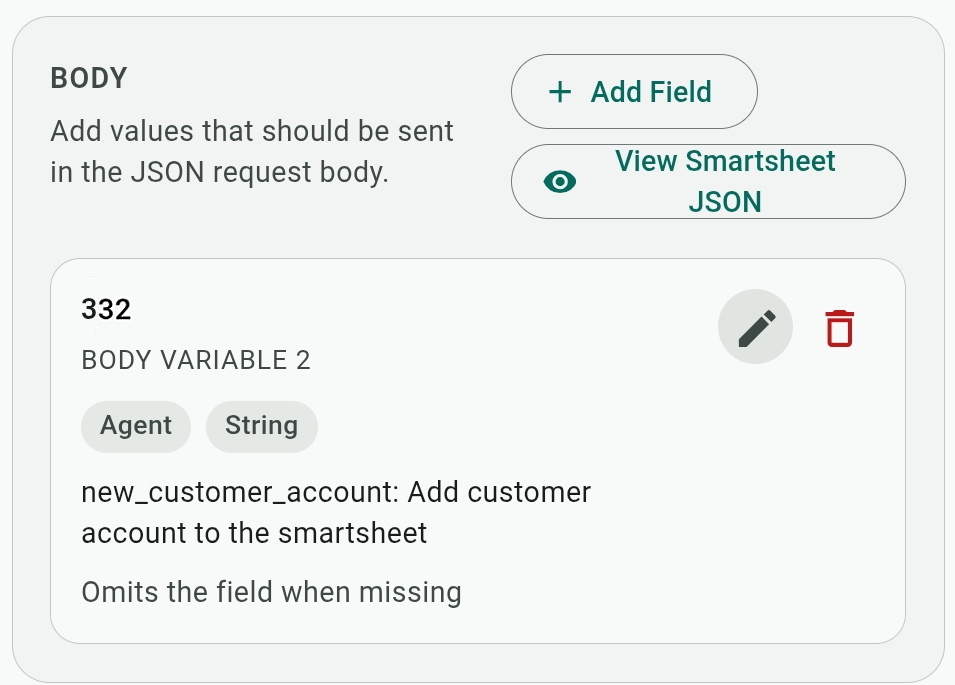
Data can be added as a new row with static or agent Body variables. The name of the variable (the Key Name field) is the ID of the targeted column (right-click a column header in Smartsheet and select "Column properties" to see and copy the column ID number).
You can use as many Body variables as needed in the same function. Each time the data is posted to the endpoint, all the body variables will be added to the same new row.
The Body variable will also automatically display a View Smartsheet JSON button when the system detects the endpoint as a Smartsheet URL. Click the button to view the sheet's details with column IDs, column data types, etc.